🪐 ✨ AI Agents for JupyterLab with 🛠️ MCP tools - Chat interface for intelligent notebook interaction, code execution, and workspace management.
Experience seamless AI-powered assistance directly within JupyterLab through our intuitive chat interface:
The chat interface is built using Pydantic AI for robust AI agent orchestration and Vercel AI Elements for the user interface components.
By default, the Jupyter MCP Server is started as a Jupyter server extension, providing access to all Jupyter MCP server tools directly through the chat interface. This enables the AI agent to interact with notebooks, execute code, manage files, and perform various Jupyter operations seamlessly.
Currently, we support Anthropic Claude Sonnet 4.0 as the AI model. To get started:
-
Set up your environment:
export ANTHROPIC_API_KEY='your-api-key-here'
-
Install Jupyter AI Agents:
pip install jupyter_ai_agents
pip uninstall -y pycrdt datalayer_pycrdt
pip install datalayer_pycrdt==0.12.17
-
Launch JupyterLab with the required configuration:
jupyter lab
-
Access the chat interface through the right panel in JupyterLab.
We're actively working on expanding the capabilities of Jupyter AI Agents:
- 🚀 More LLM Providers: Integration with additional AI model providers
- ⚙️ MCP Configuration: Enhanced MCP server configuration options
- 🔧 Extended Tool Access: Chat access to tools from other MCP servers
- 🛠️ Enhanced Features: And much more!
Check out our GitHub Issues to see what we're working on. Contributions are welcome!
Note: The documentation at https://jupyter-ai-agents.datalayer.tech will be updated soon to reflect the new chat features and capabilities.
🖥️ CLI Usage
You can also use Jupyter AI Agents through the command line interface for automated notebook operations.
To install Jupyter AI Agents, run the following command:
pip install jupyter_ai_agents
pip uninstall -y pycrdt datalayer_pycrdt
pip install datalayer_pycrdt==0.12.17
Or clone this repository and install it from source:
git clone https://github.com/datalayer/jupyter-ai-agents
cd jupyter-ai-agents
pip install -e .The Jupyter AI Agents can directly interact with JupyterLab. The modifications made by the Jupyter AI Agents can be seen in real-time thanks to Jupyter Real Time Collaboration. Make sure you have JupyterLab installed with the Collaboration extension:
pip install jupyterlab==4.4.1 jupyter-collaboration==4.0.2We ask you to take additional actions to overcome limitations and bugs of the pycrdt library. Ensure you create a new shell after running the following commands:
pip uninstall -y pycrdt datalayer_pycrdt
pip install datalayer_pycrdt==0.12.17Jupyter AI Agents provides CLI commands to help your JupyterLab session using Pydantic AI agents with Model Context Protocol (MCP) for tool integration.
Start JupyterLab, setting a port and a token to be reused by the agent, and create a notebook notebook.ipynb.
# make jupyterlab
jupyter lab --port 8888 --IdentityProvider.token MY_TOKEN
Jupyter AI Agents supports multiple AI model providers (more information can be found on this documentation page).
Set the appropriate API key for your chosen provider:
OpenAI:
export OPENAI_API_KEY='your-api-key-here'Anthropic:
export ANTHROPIC_API_KEY='your-api-key-here'Azure OpenAI:
export AZURE_OPENAI_API_KEY='your-api-key-here'
export AZURE_OPENAI_ENDPOINT='https://your-resource.openai.azure.com'
export AZURE_OPENAI_API_VERSION='2024-08-01-preview'  # optional
Important for Azure OpenAI:
- The
AZURE_OPENAI_ENDPOINTshould be just the base URL (e.g.,https://your-resource.openai.azure.com) - Do NOT include
/openai/deployments/...or query parameters in the endpoint - The deployment name is specified via the
--model-nameparameter - See
.env.azure.examplefor a complete configuration template
Other providers:
export GOOGLE_API_KEY='your-api-key-here'        # For Google/Gemini
export COHERE_API_KEY='your-api-key-here'        # For Cohere
export GROQ_API_KEY='your-api-key-here'          # For Groq
export MISTRAL_API_KEY='your-api-key-here'       # For Mistral
# AWS credentials for Bedrock
export AWS_ACCESS_KEY_ID='your-key'
export AWS_SECRET_ACCESS_KEY='your-secret'
export AWS_REGION='us-east-1'You can specify the model in two ways:
-
Using
--modelwith full string (recommended):--model "openai:gpt-4o" --model "anthropic:claude-sonnet-4-0" --model "azure-openai:deployment-name"
-
Using
--model-providerand--model-name:--model-provider openai --model-name gpt-4o --model-provider anthropic --model-name claude-sonnet-4-0
Supported providers: openai, anthropic, azure-openai, github-copilot, google, bedrock, groq, mistral, cohere
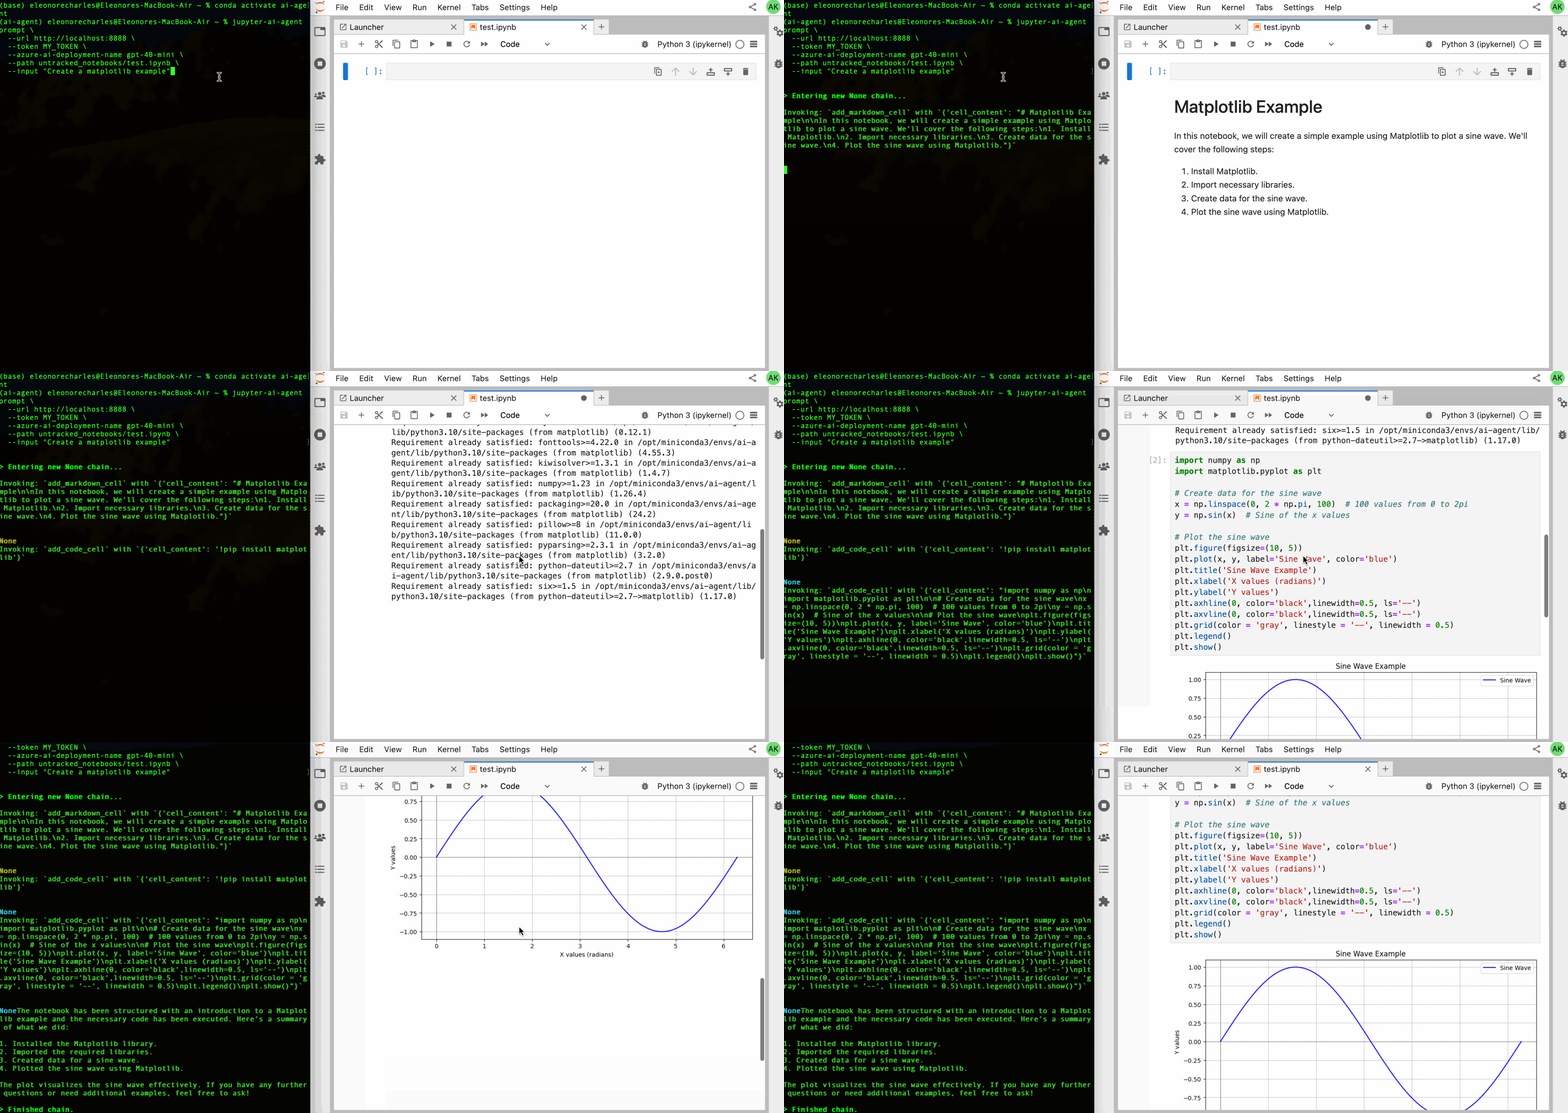
Create and execute code based on user instructions:
# Using full model string (recommended)
jupyter-ai-agents prompt \
  --url http://localhost:8888 \
  --token MY_TOKEN \
  --model "anthropic:claude-sonnet-4-0" \
  --path notebook.ipynb \
  --input "Create a matplotlib example"

# Using provider and model name
jupyter-ai-agents prompt \
  --url http://localhost:8888 \
  --token MY_TOKEN \
  --model-provider anthropic \
  --model-name claude-sonnet-4-0 \
  --path notebook.ipynb \
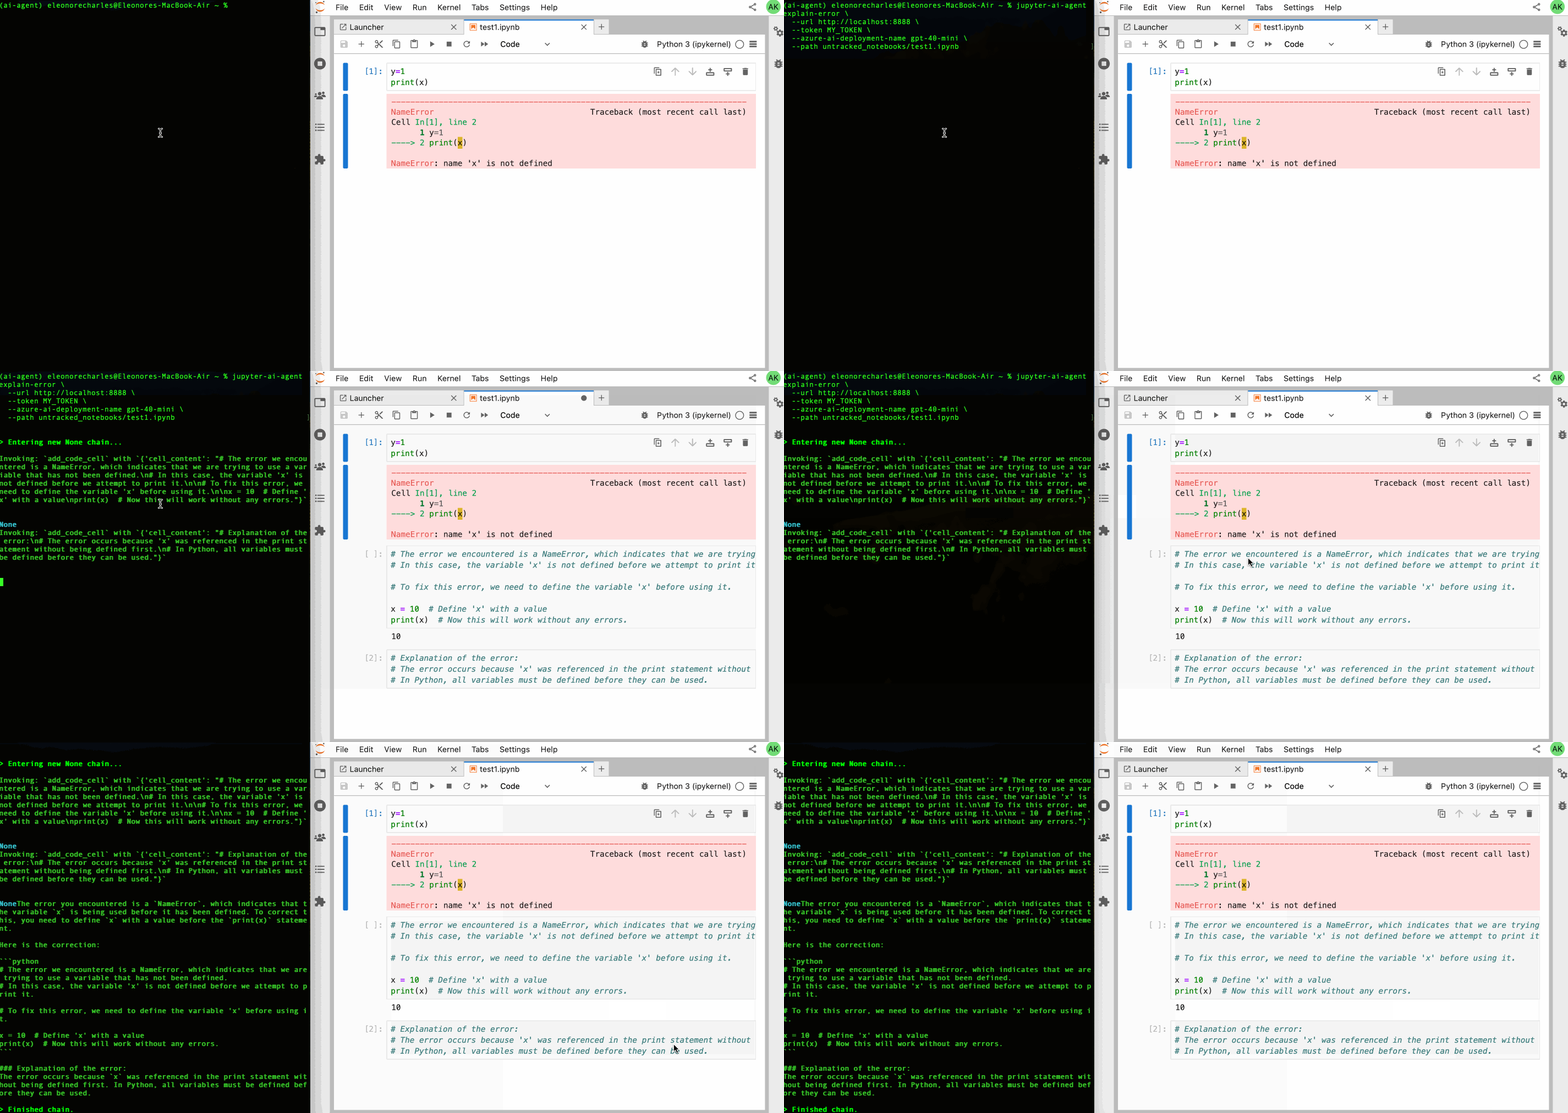
--input "Create a pandas dataframe with sample data and plot it"Analyze and fix notebook errors:
jupyter-ai-agents explain-error \
  --url http://localhost:8888 \
  --token MY_TOKEN \
  --model "anthropic:claude-sonnet-4-0" \
  --path notebook.ipynb \
--current-cell-index 5For an interactive experience with direct access to all Jupyter MCP tools, use the REPL mode:
jupyter-ai-agents repl \
  --url http://localhost:8888 \
  --token MY_TOKEN \
  --model "anthropic:claude-sonnet-4-0"
In REPL mode, you can directly ask the AI to:
- List notebooks in directories
- Read and analyze notebook contents
- Execute code in cells
- Insert new cells
- Modify existing cells
- Install Python packages
Example REPL interactions:
> List all notebooks in the current directory
> Create a new notebook called analysis.ipynb
> In analysis.ipynb, create a cell that imports pandas and loads data.csv
> Execute the cell and show me the first 5 rows
> Add a matplotlib plot showing the distribution of the 'age' column
The REPL provides special commands:
/exit: Exit the session/markdown: Show last response in markdown format/multiline: Toggle multiline input mode (use Ctrl+D to submit)/cp: Copy last response to clipboard
You can also use a custom system prompt:
jupyter-ai-agents repl \
  --url http://localhost:8888 \
  --token MY_TOKEN \
  --model "anthropic:claude-sonnet-4-0" \
--system-prompt "You are a data science expert specializing in pandas and matplotlib."Create and execute code based on user instructions:
# Using full model string (recommended)
jupyter-ai-agents prompt \
  --url http://localhost:8888 \
  --token MY_TOKEN \
  --model "anthropic:claude-sonnet-4-0" \
  --path notebook.ipynb \
  --input "Create a matplotlib example"

# Using provider and model name
jupyter-ai-agents prompt \
  --url http://localhost:8888 \
  --token MY_TOKEN \
  --model-provider anthropic \
  --model-name claude-sonnet-4-0 \
  --path notebook.ipynb \
--input "Create a pandas dataframe with sample data and plot it"Analyze and fix notebook errors:
jupyter-ai-agents explain-error \
  --url http://localhost:8888 \
  --token MY_TOKEN \
  --model "anthropic:claude-sonnet-4-0" \
  --path notebook.ipynb \
--current-cell-index 5Jupyter AI Agents empowers AI models to interact with and modify Jupyter Notebooks. The agent is equipped with tools such as adding code cells, inserting markdown cells, executing code, enabling it to modify the notebook comprehensively based on user instructions or by reacting to the Jupyter notebook events.
This Agent is innovative as it is designed to operate on the entire Notebook, not just at the cell level, enabling more comprehensive and seamless modifications.
The Agent can also run separately from the Jupyter server as the communication is achieved through RTC via the Jupyter NbModel Client and the Jupyter Kernel Client.
Jupyter AI Agents <---> JupyterLab
       |
       | RTC (Real Time Collaboration)
       |
Jupyter Clients
# Clone the repo to your local environment
# Change directory to the jupyter_ai_agents directory
# Install package in development mode - will automatically enable
# The server extension.
pip install -e ".[test,lint,typing]"Install dependencies:
pip install -e ".[test]"To run the python tests, use:
pytestpip uninstall jupyter_ai_agentsSee RELEASE.


