
In this workflow we will be focusing on creating a CD workflow. Continous deployment involves deploying to any hosted or on-premise production computes automatically.
We will be using GitHub Pages hosted in two repos to illustrate the CD concepts.
- One of the repo will host a Dev-Test instance of our app.
- The second repo will host the Production instance of the app.
These steps and Actions can be replaced with steps and Actions targeting any hosted or on-premise computes.
At the end of the exercise we will learn -
- Using environments in the workflow
- Environment secrets and approvals
- Using an Action from Marketplace
- Environment variables at workflow level and at individual jobs level
For Dev-Test environment, we will be using your fork of the ci-cd-with-actions repo to deploy to GitHub Pages. For example - kaverma/ci-cd-with-actions
- Create a new workflow file named
cd.ymlin.github\workflowsfolder. (You can also go toActionstab ->New workflowand useSkip this and set up a workflow yourself, using which you will get a basic workflow template to fill in) - Add the name of the workflow as "React App CD"
- Add triggers for the workflow as
Pushonmainandreleases/*branches - Next, we will add environment variables at workflow level, related to settings that are common for all instances where we want to deploy, so that these can be used by all the jobs in our workflow. The environement variables we want to define at workflow level are -
owneranddomainto construct the urls where our app will be deployed.
Following is the yaml for the above steps. 💡 Please replace the owner in the snippet below as the user account or organization where the repo is.
# CD workflow for React app

name: React App CD

on:
  push:
    branches:
    - main
    - releases/*

env:
  owner: <owner>
domain: github.io-
Add a new job with id
deploy-dev-test- To run on
ubuntu-latest - Name the job as "Deploy to Dev-Test environment"
- We will be specifying an environment named
Dev-Testfor this job and we will construct aurlfor this environment. This environment will be dynamically created by the Actions workflow during the first run. Refer to the yml snippet below for environment syntax. - We will define an environment variable at job level for the repository name where we will host the test instance of GitHub pages. Please note that we are defining it within Job scope as the dev-test repo hosting test instance is specific to this job. Refer to the yml snipped below for the environment variable syntax at Job scope.
- Add the following steps to this job
- Checkout the repository
- Install and Build
- Deploy to GitHub Pages by searching for an Action from Marketplace.
- We will be using
JamesIves/github-pages-deploy-action. This action will help in deploying the build folder we specify to a branch we mention.
- We will be using
You can use the following yml snippet -
- To run on
jobs:
  deploy-dev-test:
    name: Deploy to Dev test environment
    runs-on: ubuntu-latest
    environment:
      name: DevTest
      url: https://${{ env.owner }}.${{ env.domain }}/${{ env.repo }}//
    env:
      repo: ci-cd-with-actions
    steps:
      - name: Checkout
        uses: actions/checkout@v2.3.1
      - name: Install and Build
        run: |
          npm install
          npm run build
      - name: Deploy
        uses: JamesIves/github-pages-deploy-action@4.1.0
        with:
          branch: gh-pages # The branch the action should deploy to.
folder: build # The folder the action should deploy.-
Commit the above yml workflow to
mainand observe the run in Actions tab. -
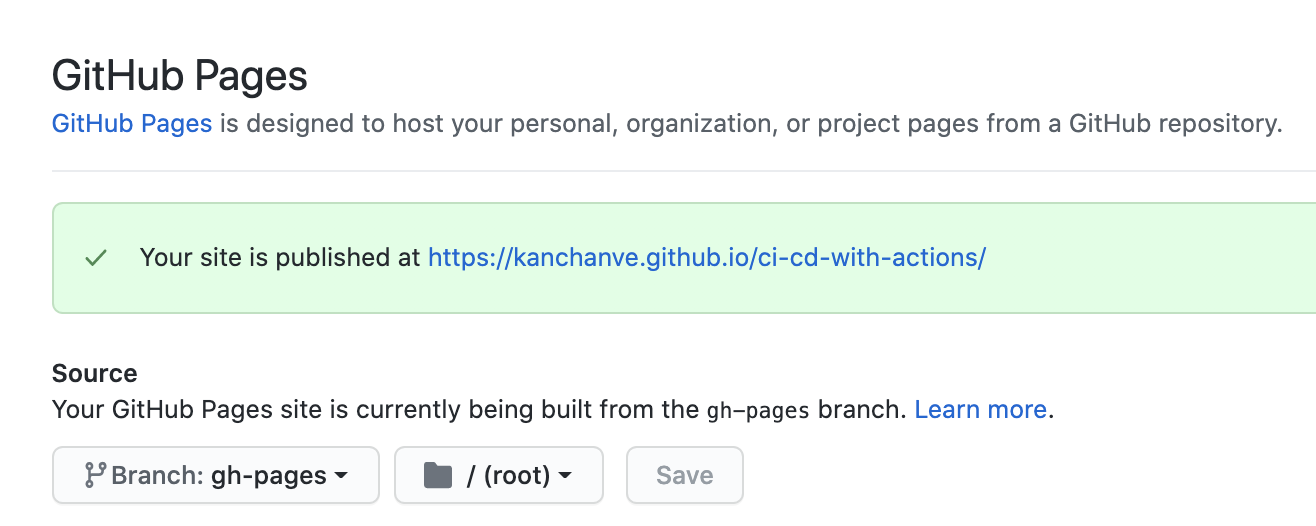
After the run has successfully completed, enable
GitHub Pagessettings to see your app deployed on Dev-Test environment.- Go to
Settingsin your repository and click onPages - Please ensure that you have chosen
gh-pagesbranch and/(root)folder. Press save. The settings should like below -
- Go to
💡 If you don't find gh-pages, please check that the workflow has completed successfully and recheck here post run completion.
On the repository's home page, on the right hand side you will find an Environments section listing down the environments.
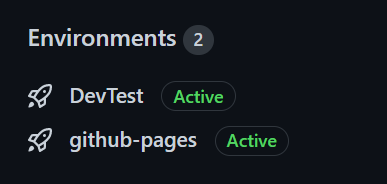
Click on Dev-Test environment and View deployment 🎉 You will find that your app has been deployed to the Dev-Test environment -
After the dev-test environment has been validated, we are ready to deploy to the next stage that is Production!
For production environment, we will create a new public repository to deploy to GitHub Pages, so that we have a separate production url where the app will be hosted.
Create a new public repository actions-workshop-prod in your user/organization account to be used for prod deployment.
- Click on your profile icon on top right corner and open
Your repositories - Press
Newto create a new repository - Provide the repo name as
actions-workshop-prod - Ensure to choose
Public - Leave rest options as default and click
Create repository
Lets go back to our ci-cd-with-actions repository to make changes to the CD workflow
- Go to 'Your repositories' from your profile icon and open the
ci-cd-with-actionsrepository
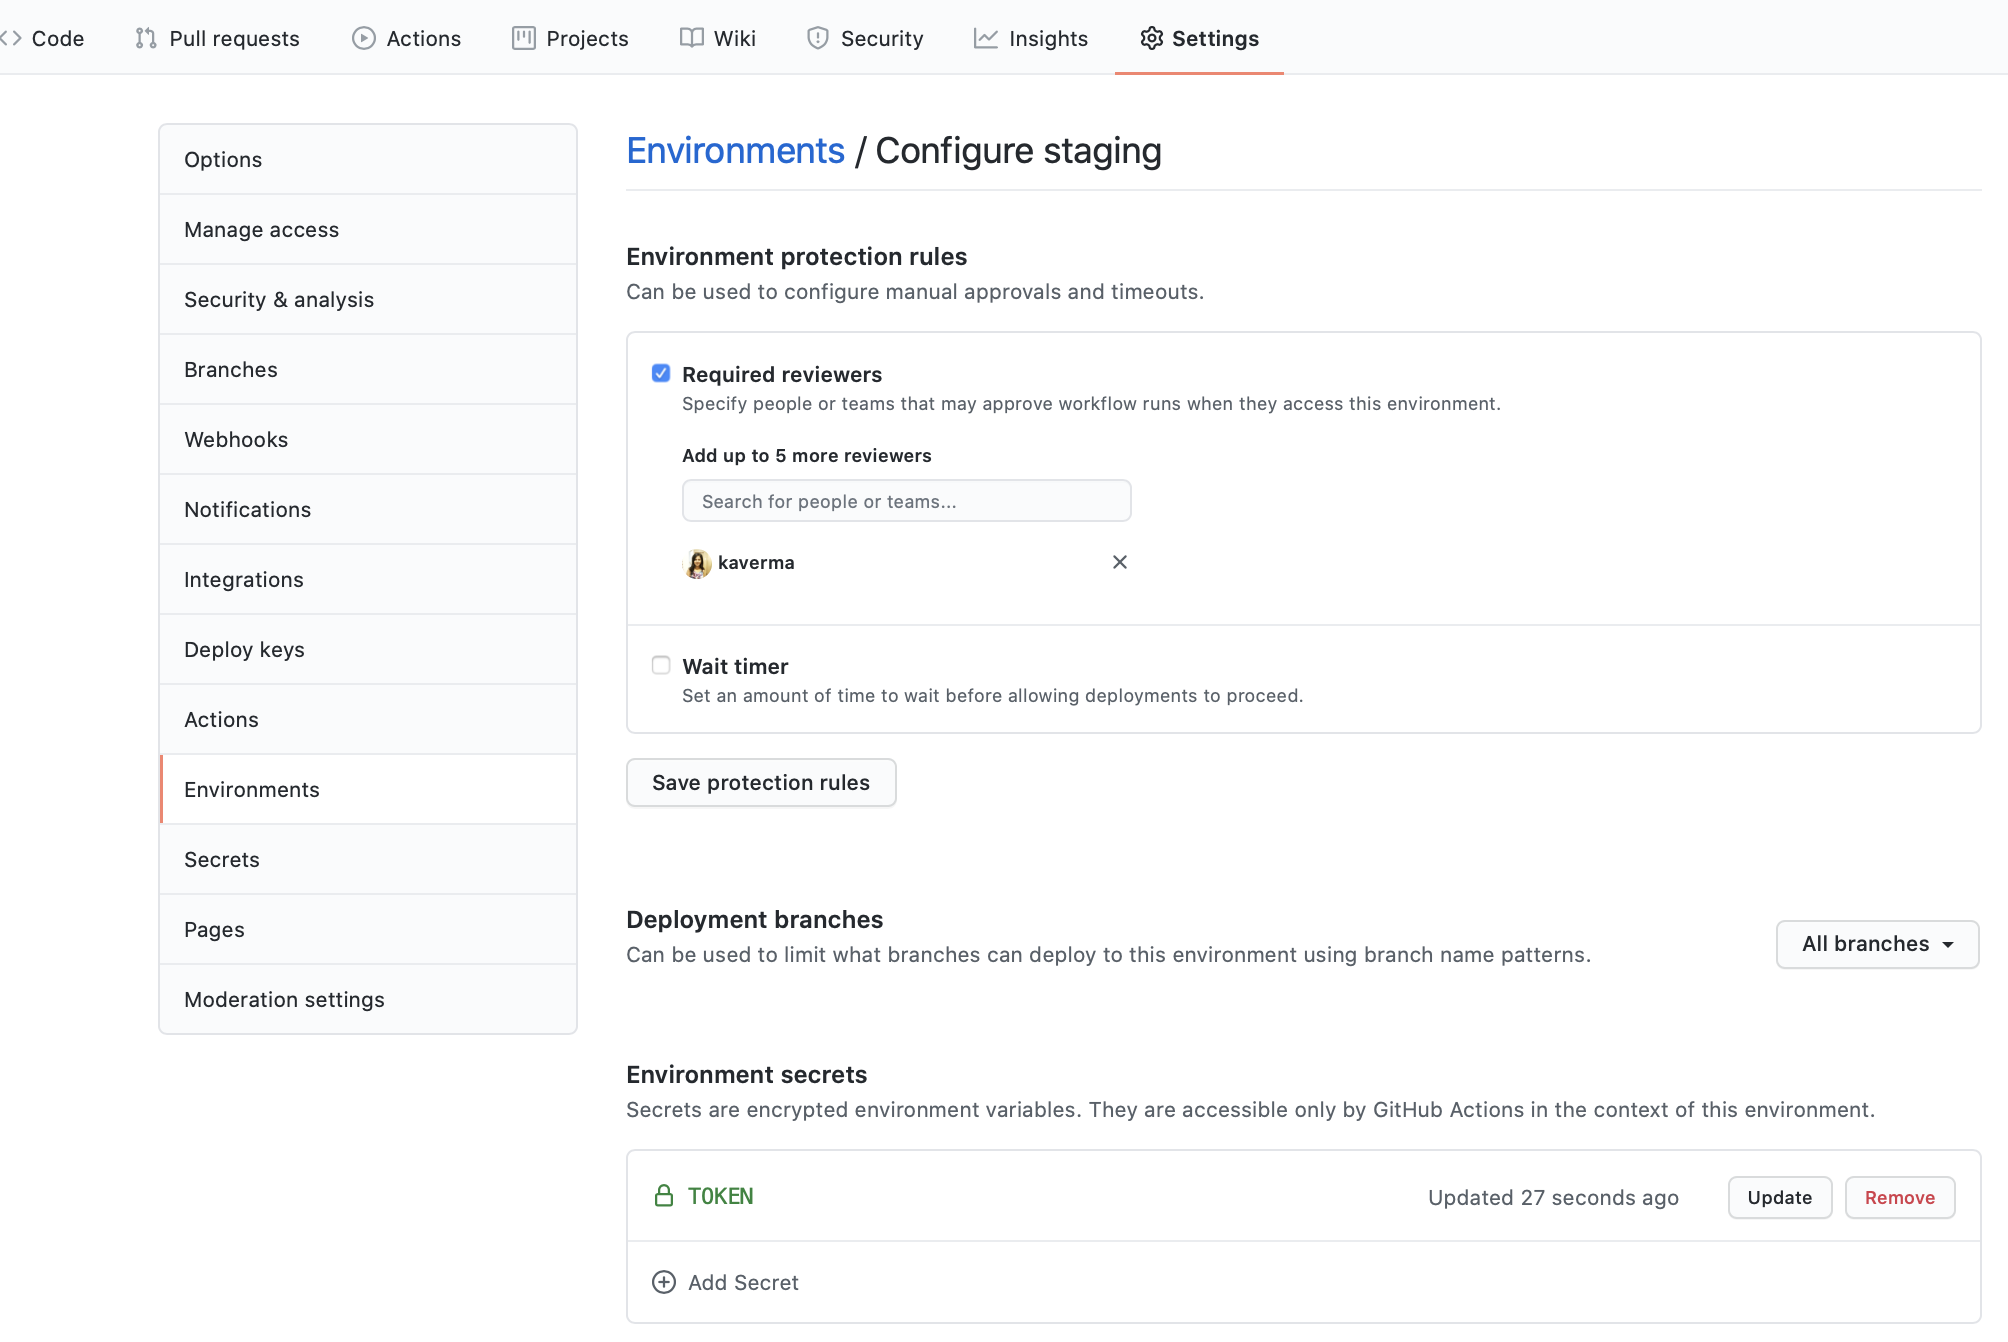
- Production environments are genrally governed by policies. So we will mimic that in our 'production' environment by adding protection rules specifically by configuraing approvals. Given that we are hosting the 'production' instance of GitHub pages in a different repository, we will configure the access token that will be required by Actions workflow to deploy. Think of this step as configuring credentials to your production compute where you intend to deploy. For adding an approval protection rule and to store the access token as a secret specific to this environment, we will configure a new Environment named
Productioninci-cd-with-actionsrepository- Open
Settingstab -> openEnvironments - Click on
New environment - Give Name as
Productionand pressConfigure environment - Checkmark
Required reviewersand add your username. ClickSave protection rules - Under
Environment secrets, clickAdd secret - Name your secret
TOKEN - Add the PAT token generated for the scope 'public_repo' the the secret value and click on 'Add secret'. If you have not generated a PAT in the prerequisites, you can use the following steps.
- Open
Click here for steps to generate PAT to access your public repositories
- Click your profile icon on top right - Go to `Settings` - Now click on `Developer Settings` from the options listed on the left side - Inside Developer Settings, click on `Personal access tokens` - Press `Generate new token` - Check mark only `public_repo` scope. - Add a note in the text box provided and click `Generate token`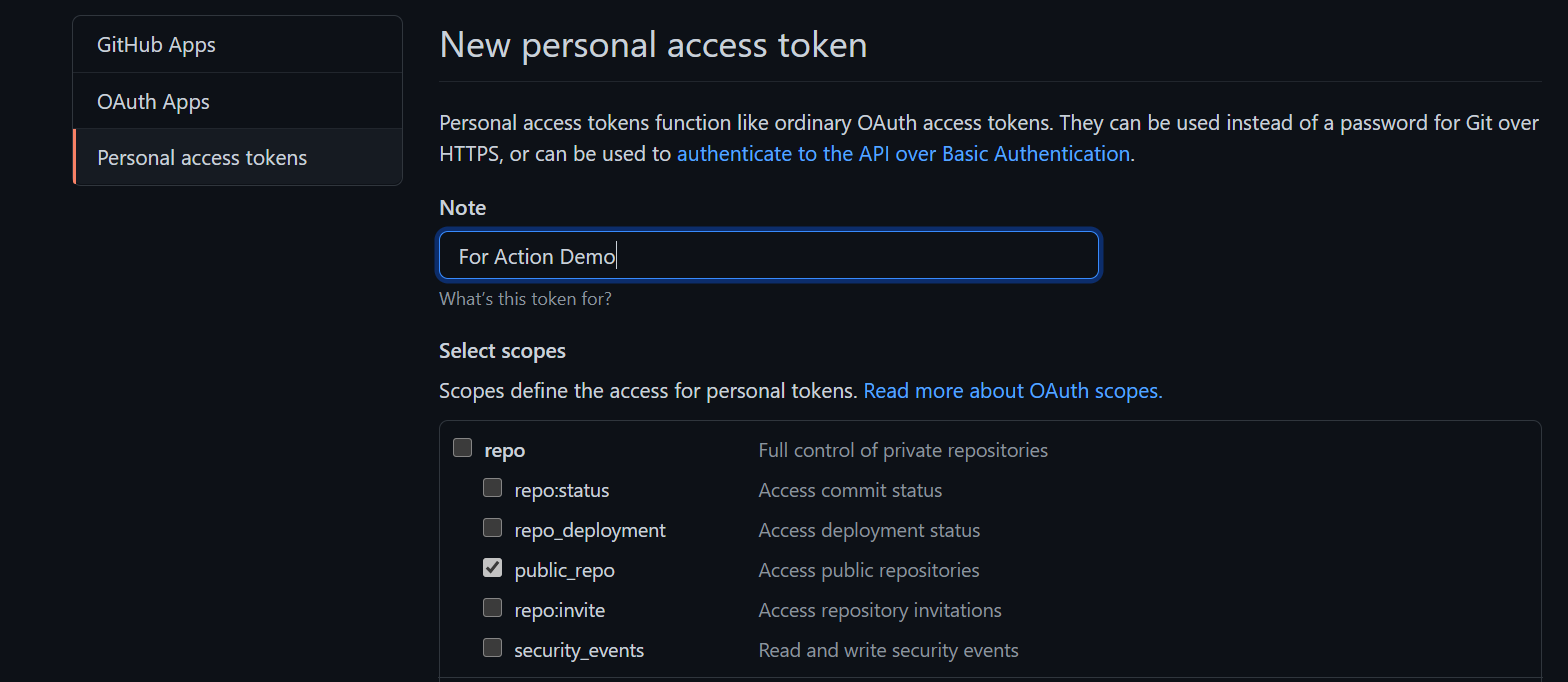
Keep this tab open or copy the generated token to a safe place. This needs to used in the environment secret setting
This is how the environment setting should look -
-
Add a job to the CD workflow for deploying to the production environment Go to
ci-cd-with-actionsrepo ->Codetab and open.github/workflows/cd.ymland edit it. Add a job to deploy to stagingdeploy-production- Ensure that this job runs only after
deploy-dev-testhave completed usingneeds. - Use the
Productionenvironment for this job. - Create a environment variable within the job scope to point to the repo where we will host the 'production' instance of GitHub pages.
- In the steps
- Checkout the repo
- Download the artifact we uploaded to GitHub Packges in CI workflow
- Deploy to GitHub Pages for the
actions-workshop-prodrepositorybuildfoldergh-pagesbranch- Provide
tokenfromEnvironment secrets
Add the following job to the workflow file -
- Ensure that this job runs only after
deploy-prod:
  name: Deploy to Production environment
  needs: [deploy-dev-test]
  runs-on: ubuntu-latest
  environment:
    name: Production
    url: https://${{ env.owner }}.${{ env.domain }}/${{ env.repo }}//
  env:
    repo: actions-workshop-prod
  steps:
    - name: Checkout
      uses: actions/checkout@v2.3.1
    - name: Install and Build
      run: |
        npm install
        npm run build
    - name: Deploy
      uses: JamesIves/github-pages-deploy-action@4.1.0
      with:
        branch: gh-pages
        folder: build
        token: ${{ secrets.TOKEN }}
        repository-name: ${{ env.owner }}/${{ env.repo }}
Please commit the workflow to main branch.
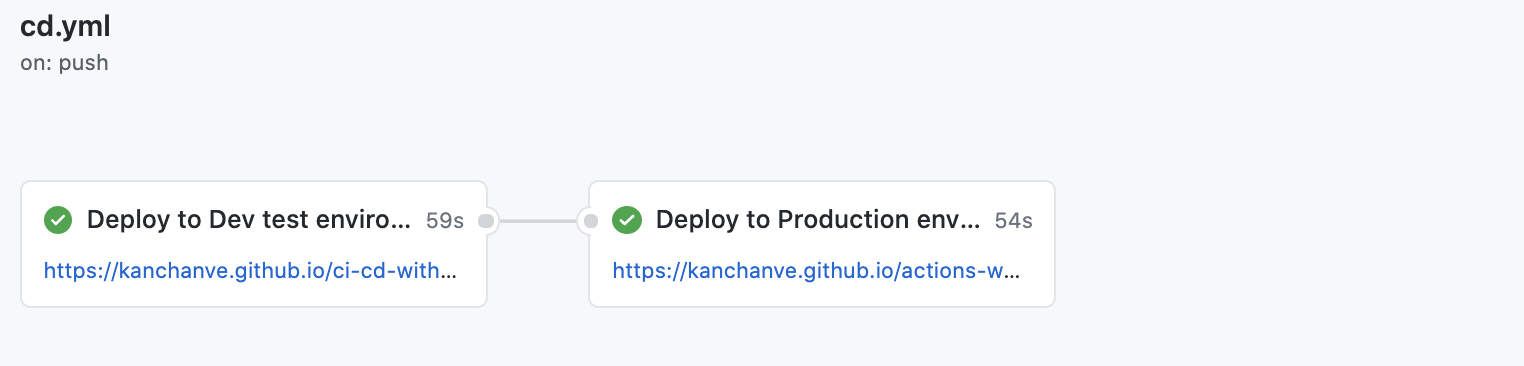
After you commit the above workflow to main, go to the Actions tab to see the workflow run for React App CD. NOTE, since we configured approval for deploying to production environment, you will need to click on Review deployments and approve for the workflow to run. Post successful deployment, you will be able to view the deployment urls in the run. Click on the production url to view the app deployed to production.
(Please check the GitHub pages setting in the action-workshop-production repository if you get 404 on the production environment)
- Click on your profile icon ->
Settings->Developer Settings->Personal access tokens - Delete the Public_repo token created for this workflow.