A comprehensive API project built with Node.js, Mongo, and featuring security implementations, rate-limiting, and robust error handling. The project is also set up for automated CI/CD deployment using GitHub Actions.
check backend service health (/) -render - https://cars-brainiac.onrender.com -heroku - https://carbrainiac-5e171b67476a.herokuapp.com (might be down)
- Project Name
- deployed link
- Table of Contents
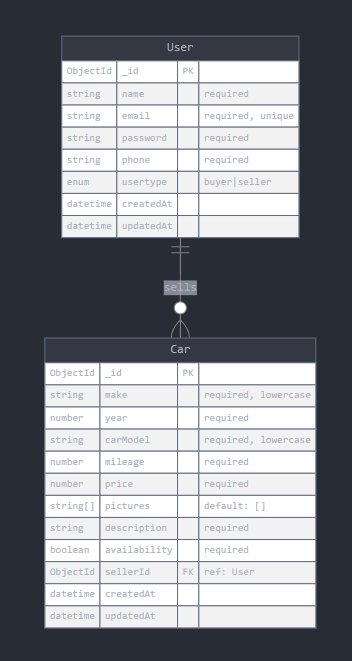
- Database diagram
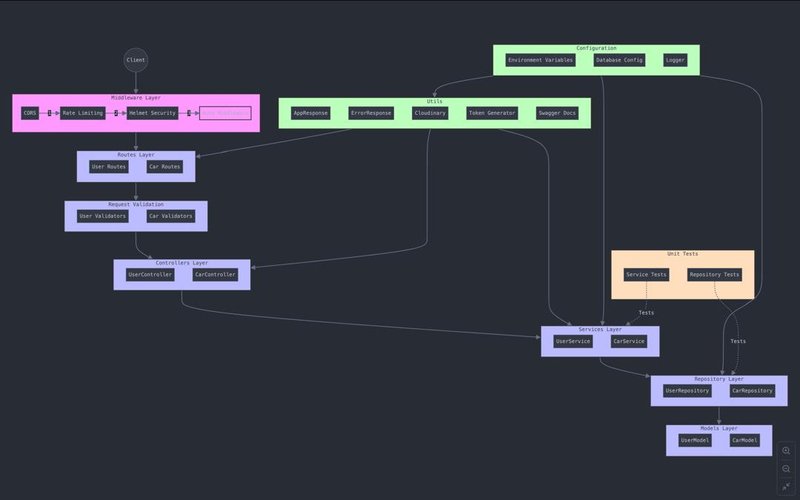
- Backend Architecture
- Security Implementations
- Error Handling
- Deploying to Heroku with GitHub Actions
- Test and Deploy to Heroku Workflow
- Swagger Documentation
Ensure that the following software is installed and running on your machine:
- Node.js: v16+
- MongoDB: Ensure MongoDB is installed and running.
git clone https://github.com/yourusername/your-repo.git
cd your-reponpm installCreate a .env file in the root directory and provide the following values:
APP_NAME=
APP_ENV=development | production
PORT=4000
MONGO_URL_DEV=<mongodb://localhost:27017/cars>
MONGO_URL_PROD=
ALLOWED_ORIGINS=http://localhost:4000,https://cars-brainiac.onrender.com
JWT_SECRET=<your_jwt_secret e.g >
TOKEN_EXPIRES=<30d>
CLOUDINARY_CLOUD_NAME=<dlbwktrdc>
CLOUDINARY_CLOUD_API_KEY=<642815273652323>
CLOUDINARY_CLOUD_API_SECRET=<fu__lJiJvHJ1g0j-MbEvhWbgUyA>
- Start the Server
npm run dev [development]

or

npm run start [production]
- To run unit test
npm run test
| HTTP Method | Endpoint | Description |
|---|---|---|
| POST | /api/users/create | Create a new user |
| POST | /api/users/login | login in user |
| POST | /api/car [Protected-seller] | post a new car by seller |
| GET | /api/car[Protected-seller&buyer] | Retrieve all posts for a user |
| POST | /api/car/:id[Protected-seller&buyer] | Add a comment to a post |
The API is restricted to specific domains via CORS middleware. The allowed origins can be configured through environment variables for flexibility.(add your local url or deployed url to ALLOWED_ORIGINS )
To prevent DDoS attacks and brute-force attempts, rate-limiting restricts the number of requests a single IP can make in a given time window.
Helmet adds security headers to protect the application from common web vulnerabilities such as XSS, clickjacking, and others.
A global error handler catches all errors and logs them via Winston for traceability. Custom error classes ensure proper status codes and error messages are returned to clients
This project is configured to automatically deploy to Heroku using GitHub Actions. The deployment process uses Docker to containerize the application and push it to Heroku's container registry. Additionally, PostgreSQL and Redis add-ons are set up to provide database and caching services.
- A Heroku account and a Heroku application.
- A GitHub repository for the project.
This repository is configured with a GitHub Actions workflow that automatically deploys the application to Heroku whenever a PR is made to the main branch (or another branch if configured) and merged.
The deployment workflow performs the following steps:
This GitHub Actions workflow automates the process of testing and deploying a Node.js application to Heroku whenever there is a push to the main branch.
-
Trigger:
The workflow is triggered on a push event to themainbranch. -
Job:
The workflow contains a single job namedtest-and-deploy, which runs on the latest version of Ubuntu. -
Steps:
-
Checkout Code:
Utilizes theactions/checkout@v2action to check out the repository's code. This step ensures that the latest version of the code is available for subsequent steps. -
Set up Node.js:
Usesactions/setup-node@v2to install and configure Node.js, specifying version 16. This ensures that the workflow runs in an environment that matches the project’s requirements. -
Install Dependencies:
Runsnpm installto install all necessary packages and dependencies for the project. This step is crucial for ensuring that the application can run and tests can be executed. -
Run Tests:
Executes the test suite usingnpm test. TheCI: trueenvironment variable is set to ensure that Jest runs in CI mode, preventing accidental hangs during testing. -
Build the Project:
Executesnpm run buildto build the project. This step compiles the application and prepares it for deployment. -
Deploy to Heroku:
Uses theakhileshns/heroku-deploy@v3.13.15action to deploy the application to Heroku. The following parameters are used:heroku_app_name: The name of your Heroku app, retrieved from GitHub Secrets.heroku_email: Your Heroku account email, also retrieved from GitHub Secrets.heroku_api_key: Your Heroku API key, securely accessed from GitHub Secrets.
-
This workflow automates the critical steps of testing and deploying a Node.js application to Heroku, ensuring that your application is always up to date and functioning correctly after every push to the main branch. By leveraging GitHub Actions, you can maintain a streamlined development process and quickly respond to changes in your codebase.
For detailed API documentation and examples of how to interact with the endpoints, please refer to the Swagger collection:
swagger Documentation Link for local: http://localhost:{PORT}/api-docs/#/Cars/get_api_cars example (http://localhost:4000/api-docs/#/Cars/get_api_cars ) for deployed: https://cars-brainiac.onrender.com/api-docs/#/