The Ultimate Single GPU Passthrough Guide
- This guide is made for people that want a gaming VM but don't really have THAT much experience with the topic, so I'm making it as DETAILED as possible to make sure every nook and cranny is perfect and every option I have come across is presented.
- This guide is written from the perspective of an Arch User, if any of the steps differ in your distribution, or I have missed something in your distribution, you can make an Issue and I'll take a look at it, you can also write to my Discord: Kimbix#0234.
- If you also feel like something is poorly redacted, I am sorry, English is not my native language and you can send corrections to my Discord (Kimbix#0234), or make an Issue.
- When a command contains brackets "[]" the content inside them are not to be taken literally and you HAVE to replace them with what is written inside them. Example: "sudo groups [your username]" I would write "sudo groups kimbix"
If you have an AMD CPU you must enable the following in your BIOS.
- IOMMU
- NX Mode
- SVM Mode
NOTE: If you cannot find any of these configurations in your BIOS, your CPU / Motherboard might not be capable of virtualization.
If you have an Intel CPU you must enable the following in your BIOS.
- VT-d
- VT-x
NOTE: If you cannot find any of these configurations in your BIOS, your CPU / Motherboard might not be capable of virtualization.
Make sure your system is in UEFI mode, if your system is fairly old you might want to take a look at this setting, else, you can proceed.
In the file "/etc/default/grub", in the line that contains GRUB_CMDLINE_LINUX_DEFAULT="...", add the following:
- amd_iommu=on / intel_iommu=on
- iommu=pt
- video=efifb:off (Helps AMD users, adding it is recommended, but not requiered)
In the file "/boot/efi/loader/entries/Pop_OS-current.conf", in the line that contains options root=UUID=, add the following:
- amd_iommu=on / intel_iommu=on
- iommu=pt
- video=efifb:off (Helps AMD users, adding it is recommended, but not requiered)
In the file "/etc/default/grub", in the line that contains GRUB_CMDLINE_LINUX="...", add the following:
- amd_iommu=on / intel_iommu=on
- iommu=pt
- video=efifb:off (Helps AMD users, adding it is recommended, but not requiered)
Reboot
Execute the following script in your terminal, copying and pasting it is fine, but if that doesn't work, place the text in a file, make it executable, and open it through your terminal.
#!/bin/bash
shopt -s nullglob
for g in /sys/kernel/iommu_groups/*; do
    echo "IOMMU Group ${g##*/}:"
    for d in $g/devices/*; do
        echo -e "\t$(lspci -nns ${d##*/})"
    done;
done;
You're going to have to look for your graphics card in the output of the script.
The following is the output of the script in my computer:
Group 15:
	2d:00.0 VGA compatible controller [0300]: Advanced Micro Devices, Inc. [AMD/ATI] Navi 14 [Radeon RX 5500/5500M / Pro 5500M] [1002:7340] (rev c5)
Group 16:
	2d:00.1 Audio device [0403]: Advanced Micro Devices, Inc. [AMD/ATI] Navi 10 HDMI Audio[1002:ab38]
You have to (USUALLY) search for a VGA compatible controller and for HDMI Audio.
- The GPU and it's sound device are in diferent IOMMU groups, this is of no importance and you should proceed normally
- The GPU and it's sound device are in the same IOMMU group, this is completely normal and you should give zero atention to this fact.
- Another device is in the IOMMU group alongside the GPU and it's audio device, if this is the case, you'll HAVE to include the other devices in the following steps.
Group 15:
	2d:00.0 VGA compatible controller [0300]: Advanced Micro Devices, Inc. [AMD/ATI] Navi 14 [Radeon RX 5500/5500M / Pro 5500M] [1002:7340] (rev c5)
Group 16:
	2d:00.1 Audio device [0403]: Advanced Micro Devices, Inc. [AMD/ATI] Navi 10 HDMI Audio[1002:ab38]
2d:00.0 & 2d:00.1 -> These values will be important, save them. [1002:7340] & [1002:ab38] -> These values will also be important, save them
Install the following packages:
sudo pacman -S virt-manager qemu vde2 ebtables iptables-nft nftables dnsmasq bridge-utils ovmf
:: iptables and iptables-nft are in conflict. Remove iptables? [y/N]
Install the following package group:
sudo dnf install @virtualization
Install the following packages:
sudo apt install qemu-kvm libvirt-clients libvirt-daemon-system bridge-utils virt-manager ovmf
Install the following packages:
sudo zypper in libvirt libvirt-client libvirt-daemon virt-manager virt-install virt-viewer qemu qemu-kvm qemu-ovmf-x86_64 qemu-tools
In the following file "/etc/libvirt/libvirt.conf", look for the following lines and remove the "#" from them:
#unix_sock_group = "libvirt"
#unix_sock_rw_perms = "0770"
If you want detailed logs, in the same file, add the following lines at the end of the file:
log_filters="1:qemu"
log_outputs="1:file:/var/log/libvirt/libvirtd.log"
Now, we are going to add our user to the libvirt group, to do so, execute the following command:
sudo usermod -a -G libvirt $(whoami)
We can verify that we we're added to the group if the output of the following command contains libvirt:
sudo groups $(whoami)
Once we have edited the configuration files and added our user to the libvirt group, we have to start / restart libvirtd and make it autostart on boot:
systemd:
sudo systemctl start libvirtd (If service wasn't started already)
sudo systemctl enable libvirtd

OpenRC:
rc-service libvirtd start (If service wasn't started already)
rc-update add libvirtd default
In the file "/etc/libvirt/qemu.conf", look for the following lines, remove the "#" from them, and add the requested information:
#user = "root" 	-> user = "[your username]"
#group = "root" -> group = "[your username]"
Once the file has been edited, restart the libvirtd service with the following command:
systemd:
sudo systemctl restart libvirtd

OpenRC:
sudo rc-service libvirtd restart
NOTE: For specific use in distros like Ubuntu / Linux Mint / POP_OS, add yourself to the kvm group with the following command:
sudo usermod -a -G kvm $(whoami)
We can verify that we we're added to the group if the output of the following command contains kvm:
sudo groups $(whoami)
To make the virtual machine network start on boot, execute the following commands:
sudo virsh net-autostart default
And to manually start it execute the following command:
sudo virsh net-start default
- A Windows 10 ISO: https://www.microsoft.com/en-us/software-download/windows10ISO.
- VirtIO Drivers: https://fedorapeople.org/groups/virt/virtio-win/direct-downloads/stable-virtio/virtio-win.iso.
- Select the QEMU/KVM Connection.
- Select to install the OS using local media.
- Select Browse -> Browse Local -> Your Windows 10 ISO file.
- Leave the RAM and CPU settings the default (we will change them later).
- Create a disk image for the virtual machine (If using for gaming my recommended size is 128GB), you can use .qcow2 or .raw, it doesn't really affect performance that much.
- IMPORTANT: Check the box "Customize configuration before install", and select Finish.
- Overview: Make sure the chipset is set to Q35 and the Firmware option is set to UEFIx86_64:/usr/share/edk2-ovmf/x64/OVMF_CODE.fd (You might have multiple OVMF_CODE.fd available to you, the preferred option is the one that has in it's path x64).
- CPUs: Uncheck the box Copy host CPU configuration, and set the Model to host-passthrough; Under the topology section, check the box Manually set CPU topology, and set it to whatever your CPU is like, usually you only have 1 socket, and then multiply the Cores * Threads to get your vCPU allocation, Virt-Manager will indicate you if your configuration is invalid.
- Memory: Allocate memory to the virtual machine (NOTE: If your memory allocation is NOT valid, the VM might not boot, the safest values are multiples of 2048).
- Boot Options: Check the SATA CDROM 1 box and move it to the top of the list.
- SATA Disk 1: Change the Disk bus to VirtIO; Under the Advanced options section change the Cache mode to writeback.
- Network Section (2 computers): Change the Device model to virtio.
- Add Hardware: Under the storage section, select device type CDROM device, and select the VirtIO drivers (Manage -> Browse Local -> VirtIO drivers).
Once you are inside of the Windows installation, once you are prompted to select a type of install, select Custom Install; Windows will not be able to read the virtual disk without the VirtIO drivers, so you'll have to load them manually. Select Load Drivers and Windows will automatomatically detect the VirtIO drivers and will ask you to select one, select the w10 drivers and wait for them to install. Otherwise if Windows does NOT automatically detect the VirtIO drivers, look for them in your filesystem or check that you added the hardware properly. Once the Windows installation media can detect the Virtual Disk, select the disk to perform the instalation and wait for the installation to complete.
Once you're inside of Windows, install the VirtIO drivers and turn off the VM.
Once you have finished the Windows installation and the VM is turned off, you can remove any Spice Hardware and the CDROM disks, as they won't be needed anymore.
Now, to get the GPU working, we will have to look for it's vBIOS.
There are multiple ways to go about doing this, and I will cover every way I know of doing it:
The only reliable website I have knowledge of that provides GPUs vBIOS, is TechPowerup.com, if you're planning on aquiring your vBIOS this way, you HAVE to know the EXACT model of your GPU, otherwise it will not work.
Techpowerup website: https://www.techpowerup.com/vgabios/
If you have a way to boot into Windows 10 using your GPU (The VM doesn't work), you can use a program like CPU-Z to aquire the vBIOS.
CPU-Z website: https://www.cpuid.com/softwares/cpu-z.html
If you don't want to boot into Windows 10 and don't want to download it from the internet, you can dump it directly from Linux with these programs:
NVIDIA: https://www.techpowerup.com/download/nvidia-nvflash/ AMD: https://www.techpowerup.com/download/ati-atiflash/
To dump it using these programs you will have to follow these steps:
- Ctrl + Alt + F2 into a Terminal
- Stop your display manager with "sudo systemctl stop [Your display manager].service" or "sudo rc-service stop [Your display manager]".
- Unload your GPU modules with "sudo rmmod nvidia, nvidia_uvm, nvidia_modeset" or "sudo rmmod amdgpu" (I don't know if this step is necesary for AMD users, as I did not do it when dumping my vBIOS).
- cd into the directory where the file is located and make the file executable with the following command "chmod u+x [nvflash / amdvbflash]".
- Execute the following command to save the vBIOS in your current directory "sudo ./nvflash_linux --save test.rom" or "sudo ./ati --save test.rom".
- Load your modules once more "sudo modprobe nvidia, nvidia_uvm, nvidia_modeset" or "sudo modprobe amdgpu" and start your display manager again "sudo systemctl start [Your display manager].service" or "sudo rc-service start [Your display manager]".
This is a complicated (and honestly annoying) step.
First, download a HEX editor and open the rom file with it. Using the search function of your preferred editor, search for the text "VIDEO", once you find it, remove everything before the first letter U to the left of "VIDEO".
These images might help visualize what I'm trying to say:
(Image from Risingprism's guide)
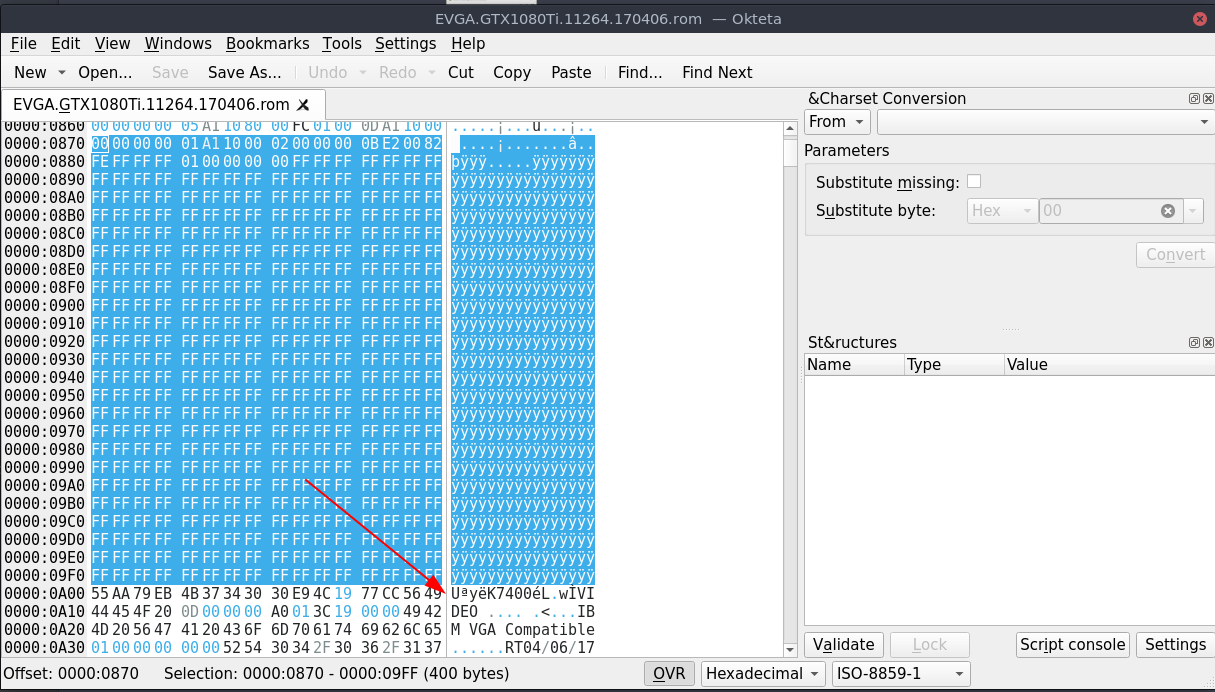
NOTE: IF YOU CANNOT FIND VIDEO IN YOUR vBIOS, THIS MIGHT MEAN IT'S ALREADY "PATCHED", IF THE FIRST LETTER OF YOUR VBIOS IS A U, THIS MIGHT IN FACT BE THE CASE.
Save the file and proceed to the next step.
- Make the following directory "sudo mkdir /var/lib/libvirt/vbios".
- Place the rom in above directory with "sudo mv [path to your .rom file] /var/lib/libvirt/vbios/GPU.rom".
- cd into the directory with "cd /var/lib/libvirt/vbios".
- Add the propper permissions to the file with "sudo chmod -R 660 GPU.rom".
- Tell the system you own the file with "sudo chown [your username:your username] GPU.rom".
- Change your SELinux configuration with "sudo semanage fcontext -a -t virt_image_t /var/lib/libvirt/vbios/GPU.rom".
- Change the context of the file with "sudo restorecon -v /var/lib/libvirt/vbios/GPU.rom".
- Make the following directory "sudo mkdir /usr/share/vgabios".
- Place the rom in above directory with "sudo mv [path to your .rom file] /usr/share/vgabios/GPU.rom".
- cd into the directory with "cd /usr/share/vgabios".
- Change the permissions of the file with "sudo chmod -R 660 GPU.rom".
- Tell the system you own the file with "sudo chown username:username GPU.rom ".
Make the directory (If not created already) "/etc/libvirt/hooks" and cd into it "cd /etc/libvirt/hooks".
Here, we care about 3 files:
- /etc/libvirt/hooks/qemu
- /etc/libvirt/hooks/qemu.d/[Name of your VM]/prepare/begin/start.sh
- /etc/libvirt/hooks/qemu.d/[Name of your VM]/release/end/stop.sh
Open the qemu file with root privileges and make sure it has the following content:
#!/bin/bash
#
# Author: Sebastiaan Meijer (sebastiaan@passthroughpo.st)
#
# Copy this file to /etc/libvirt/hooks, make sure it's called "qemu".
# After this file is installed, restart libvirt.
# From now on, you can easily add per-guest qemu hooks.
# Add your hooks in /etc/libvirt/hooks/qemu.d/vm_name/hook_name/state_name.
# For a list of available hooks, please refer to https://www.libvirt.org/hooks.html
#

GUEST_NAME="$1"
HOOK_NAME="$2"
STATE_NAME="$3"
MISC="${@:4}"

BASEDIR="$(dirname $0)"

HOOKPATH="$BASEDIR/qemu.d/$GUEST_NAME/$HOOK_NAME/$STATE_NAME"

set -e # If a script exits with an error, we should as well.

# check if it's a non-empty executable file
if [ -f "$HOOKPATH" ] && [ -s "$HOOKPATH"] && [ -x "$HOOKPATH" ]; then
    eval \"$HOOKPATH\" "$@"
elif [ -d "$HOOKPATH" ]; then
    while read file; do
        # check for null string
        if [ ! -z "$file" ]; then
          eval \"$file\" "$@"
        fi
    done <<< "$(find -L "$HOOKPATH" -maxdepth 1 -type f -executable -print;)"
fi
(The qemu script does not belong to me, it's made by someone else, this script is usually not configured user-by-user as it will work on "almost" any setup")
Execute the following commands to make the necessary folders and files (If not already created):
sudo mkdir /etc/libvirt/hooks/qemu.d
sudo mkdir /etc/libvirt/hooks/[Name of your VM]

sudo mkdir /etc/libvirt/hooks/[Name of your VM]/prepare
sudo mkdir /etc/libvirt/hooks/[Name of your VM]/prepare/begin
sudo touch /etc/libvirt/hooks/[Name of your VM]/prepare/begin/start.sh

sudo mkdir /etc/libvirt/hooks/[Name of your VM]/release
sudo mkdir /etc/libvirt/hooks/[Name of your VM]/release/end
sudo touch /etc/libvirt/hooks/[Name of your VM]/release/end/stop.sh
This is kind of like a choose your path adventure, where you choose your system configuration to make the script.
First, we begin with the absolutely necessary:
#!/bin/bash
If we want to add output when debugging, we add
set -x
Now we gotta stop our display manager, usually just writting systemctl stop display-manager.service is enough, but we might have to specify, so it's safer to add the line like so:
systemd
systemctl stop [Your display manager].service

OpenRC
rc-service [Your display manager] stop
If you use GNOME or GDM, you must add this line to the script:
killall gdm-x-session
We unbind the VT consoles, The ammount of unbind commands is equal to the ammount of vtconsoles you have, to check the ammount of vtconsoles you have, execute the following command "ls /sys/class/vtconsole/ | grep vtcon", and change the ammount of unbind commands depending on the output.
echo 0 > /sys/class/vtconsole/vtcon0/bind
echo 0 > /sys/class/vtconsole/vtcon1/bind
Now we unbind the EFI-Framebutter with the following command:
echo efi-framebuffer.0 > /sys/bus/platform/drivers/efi-framebuffer/unbind
We make the system wait for a few seconds to avoid running into problems, the wait time can be adjusted, but I don't recommended to make it less than 3 seconds.
sleep [Ammount of seconds]
Now, we unload the drivers from the GPU, to know which drivers are currently in use by the devices we're goint to pass through, we can execute the command "lspci -nnk", in the output, we look for the devices that we're goint to pass, and read the line that says "Kernel driver in use: ..."
Example output:
2d:00.0 VGA compatible controller [0300]: Advanced Micro Devices, Inc. [AMD/ATI] Navi 14 [Radeon RX 5500/5500M / Pro 5500M] [1002:7340] (rev c5)
	Subsystem: XFX Pine Group Inc. Device [1682:5501]
	Kernel driver in use: amdgpu
	Kernel modules: amdgpu

2d:00.1 Audio device [0403]: Advanced Micro Devices, Inc. [AMD/ATI] Navi 10 HDMI Audio [1002:ab38]
	Subsystem: XFX Pine Group Inc. Device [1682:5501]
	Kernel driver in use: snd_hda_intel
	Kernel modules: snd_hda_intel

In my case, I would have to unload the amgpu and snd_hda_intel drivers.
Using the information above, we unload the kernel modules accordingly:
In my case, I would unload the drivers like this:
	modprobe -r amdgpu
	modprobe -r snd_hda_intel
Now, we unbind the GPU from the display driver with the following command:
Remember the numbers we got from the IOMMU script, we are using the first of the 2 values here (Remember to add ALL of the devices that belong in your IOMMMU group).

This is how I personally have it in my configuration:
Values:
	2d:00.0
	2d:00.1
Commands:
	virsh nodedev-detach pci_0000_2d_00_0
	virsh nodedev-detach pci_0000_2d_00_1
And finally we load the VFIO kernel module (We will come back to this later):
modprobe vfio
modprobe vfio_pci
modprobe vfio_iommu_type1
Your start.sh script should look something like this:
#!/bin/bash
# Debugging
set -x

# Stop the display manager
systemctl stop sddm.service

# Unbind VTconsoles
echo 0 > /sys/class/vtconsole/vtcon0/bind
echo 0 > /sys/class/vtconsole/vtcon1/bind

# Unbind EFI-Framebuffer
echo efi-framebuffer.0 > /sys/bus/platform/drivers/efi-framebuffer/unbind

# Avoid problems by waiting.
sleep 4

# Unload all AMD drivers
modprobe -r amdgpu
modprobe -r snd_hda_intel

# Unbind the GPU from display driver
virsh nodedev-detach pci_0000_2d_00_0
virsh nodedev-detach pci_0000_2d_00_1

# Load VFIO kernel module
modprobe vfio
modprobe vfio_pci
modprobe vfio_iommu_type1
Finally, we make the file executable with "chmod +x /etc/libvirt/hooks/qemu.d/[Name of your VM]/prepare/begin/start.sh" and continue to make our release script.
The stop script is not AS IMPORTANT as the start script, as one could just issue a restart when the machine is stopped to get back to linux, but if one wants to go back to linux after using the VM without the need of a restart, we have to make a stop script.
We begin with the absolutely necessary:
#!/bin/bash
First, we unload the VFIO drivers as the first thing we do:
modprobe -r vfio
modprobe -r vfio_pci
modprobe -r vfio_iommu_type1
We then Rebind the GPU to the AMD drivers with the following commands
Remember to use YOUR values to make these commands, these is how I have it personally set up:
Values:
	2d:00.0
	2d:00.1
Commands (IMPORTANT: we add the devices in decreasing order, in this case 1 then 0):
	virsh nodedev-reattach pci_0000_2d_00_1
	virsh nodedev-reattach pci_0000_2d_00_0
We rebind the EFI-Framebutter with the following command:
echo "efi-framebuffer.0" > /sys/bus/platform/drivers/efi-framebuffer/bind
Then we reload the modules we unloaded in the start script:
These are the modules I unloaded in my start script and thus, I have to reload them in the release script

modprobe amdgpu
modprobe snd_hda_intel
We rebind the VTconsoles we unbinded in the start script
echo 1 > /sys/class/vtconsole/vtcon0/bind
echo 1 > /sys/class/vtconsole/vtcon1/bind
NVIDIA users might want to add the following to their scripts:
nvidia-xconfig --query-gpu-info > /dev/null 2>&1
And finally, we restart the display manager to get back into linux:
systemd
systemctl start [Your display manager].service

OpenRC
rc-service [Your display manager] start
My personal stop script looks like this:
#!/bin/bash
set -x

# Unload VFIO-PCI Kernel Driver
modprobe -r vfio_pci
modprobe -r vfio_iommu_type1
modprobe -r vfio

#  Re-Bind EFI-Framebuffer
echo "efi-framebuffer.0" > /sys/bus/platform/drivers/efi-framebuffer/bind

# Re-Bind GPU to AMD Driver
virsh nodedev-reattach pci_0000_2d_00_1
virsh nodedev-reattach pci_0000_2d_00_0

# Reload AMD kernel modules
modprobe amdgpu
modprobe snd_hda_intel

# Rebind VT consoles
echo 1 > /sys/class/vtconsole/vtcon0/bind
echo 1 > /sys/class/vtconsole/vtcon1/bind

# Restart the display manager
systemctl start sddm.service
Finally, we make the file executable with "chmod +x /etc/libvirt/hooks/qemu.d/[Name of your VM]/release/end/stop.sh" and continue.
These scripts require a user systemd service, you can keep systemd services running by enabling linger for your user account with the following command "sudo loginctl enable-linger [your username]", This keeps services running even when your account is not logged into, this is an insecure practice and should be avoided.
If you in fact, choose to avoid doing this, you WILL have to reboot your computer every time you want to go back to linux.
I don't know how one would go about doing this in OpenRC, so if using OpenRC either you have to reboot, or look for an alternative, if someone in fact finds an alternative that works, please share it with me in my discord or create an Issue / Pull Request.
IF YOU CANNOT GET BACK TO LINUX EVEN AFTER TRYING MILLIONS OF DIFFERENT RELEASE SCRIPTS, MY RECOMENDATION IS TO JUST EXECUTE A REBOOT COMMAND IN THE RELEASE SCRIPT.
Open the configurations of your VM in virt-manager and select the option to Add Hardware, go into PCI devices and add every device that was in the IOMMU group from the IOMMU section.
Enable XML editing in your virt-manager preferences (Edit -> Preferences -> General -> Check Enable XML editing), and add the following line above the
in every device you add:<hostdev mode="subsystem" type="pci" managed="yes">
<source>
<address domain="0x0000" bus="0x2d" slot="0x00" function="0x0"/>
</source>
<rom file="/var/lib/libvirt/vbios/GPU.rom"/> (ADD THIS LINE)
<address type="pci" domain="0x0000" bus="0x06" slot="0x00" function="0x0"/>
</hostdev>
NOTE: If you are on an selinux system (Fedora) remember to change your path to "/var/lib/libvirt/vbios/GPU.rom"
If you want to use USB devices in your VM (Like a mouse and keyboard), your must add them the same way you added the GPU, but instead of going to the PCI devices, you go to the USB devices and add the desired ones.
Most of these don't require further setup to get working.
su into your root user and execute the following commands. export EDITOR=[Text editor of preference] virsh edit [Name of VM]
Edit or add the following lines
  </os>
  <features>
    <acpi/>
    <apic/>
    <hyperv>
      <relaxed state='on'/>
      <vapic state='on'/>
      <spinlocks state='on' retries='8191'/>
      <vendor_id state='on' value='123456789123'/>
    </hyperv>
    <kvm>
      <hidden state='on'/>
    </kvm>
    <vmport state='off'/>
    <ioapic driver='kvm'/>
Edit or add the following lines:
</features>
  <cpu mode='host-passthrough' check='none'>
    <topology sockets='1' cores='6' threads='2'/>
    <feature policy='require' name='topoext'/>
  </cpu>
Edit or add the following lines:
</features>
  <cpu mode='host-passthrough' check='none'>
    <topology sockets='1' cores='6' threads='2'/>
    <feature policy='disable' name='smep'/>
  </cpu>
Change the following line:
From:
	<loader readonly='yes' type='pflash'>/usr/share/edk2/ovmf/OVMF_CODE.fd</loader>
To:
	 <loader readonly='yes' type='rom'>/usr/share/edk2-ovmf/x64/OVMF_CODE.fd</loader>
Due to an annoying bug, Navi Series 10 GPU's can't turn off while the system is booted, making it impossible to pass them to a VM. Fortunately, people way smarter than me have found workarounds to this, and have found a very good one:
Vendor-Reset: https://github.com/gnif/vendor-reset
If you in fact NEED this to get it working, follow the instructions on how to install the repository.
Create the following file "/lib/systemd/system/vrwa.service" with:
sudo touch /lib/systemd/system/vrwa.service
And open it with the text editor of your choice with root privileges.
Make it's contents this:
[Unit]
Description=vrwa Service
After=multi-user.target

[Service]
ExecStart=/usr/bin/bash -c 'echo device_specific > /sys/bus/pci/devices/0000:0c:00.0/reset_method'

[Install]
WantedBy=multi-user.target
Start and enable the service with
systemctl start vrwa
systemctl enable vrwa
And you SHOULD be good to go.
Remember the other values of the IOMMU groups that we never used, we're going to use them here.
When loading the VFIO modules, we have to specify which devices will be controlled by said modules, we do so by editing the "/etc/modprobe.d/vfio.conf" file, we open it with our text editor of preference with root privileges and change it's contents to the following:
The ids have to be the ones extracted from the IOMMU script, they don't have to be in any specific order.

I personally have it set up like this:
options vfio-pci ids=1002:7340,1002:ab38
Once this is done, the virtual machine will be good to go.
- Thanks to Risingprism's guide for being the backbone of this guide. Link to their guide: https://gitlab.com/risingprismtv/single-gpu-passthrough/-/wikis/home
- Thanks to joeknok90's guide for providing some extra information that was not provided in Risingprism's guide. Link to their guide: https://github.com/joeknock90/Single-GPU-Passthrough
- Thanks to the entire developer team behind the vendor-reset module. Link to the repo: https://github.com/gnif/vendor-reset
- Thanks to maier-johno for providing a solution to the vendor-reset module problem with newer kernels. Link to their profile https://github.com/maier-johno
I hated every second of making this guide oh my god why did I go through the pain of making this, I guess I wanted to make something educational IDK its like 2AM I need some sleep. Goodnight Tristate Area.
If something, ANYTHING, goes wrong, do NOT feel afraid of contacting me through discord, I want to make this guide as ACCURATE as possible, since all other guides seem to be so confident in their configurations, but literally every single one of them failed to mention the vendor-reset bug, very little of them mentioned the vfio-pci modules configuration, and some other little discrepancies in between all of the guides.
Discord Kimbix#0234, if I'm green, I'll answer 99% of the time.