![]()
![]()
![]()
![]()
This repo introduces a ready-to-use Cyphal/DroneCAN application for RL Mini v2 and RL Mini v3 nodes.
Please, refer Wiki for details:
Supported features:
- Both Cyphal/CAN and DroneCAN protocols or one of them in a single firmware,
- You can try the software in Software-In-The-Loop (SITL) mode,
- Small firmware image and software is friendly for customization,
- Redundant CAN interface (node v3),
- MPU-9250 IMU (node v3).
- CAN terminator resistors control (node v3).
Roadmap / Not supported or tested yet:
- Cyphal/DroneCAN Bootloader,
- Dynamic Node Allocation (DNA),
- Vibration Analysis: estimate dominant frequency and magnitude of vibrations for diagnosing mechanical issues or ensuring smooth operation in drones or robotic platforms in real time.
- AS5600 I2C sensor encoder for servo position estimation
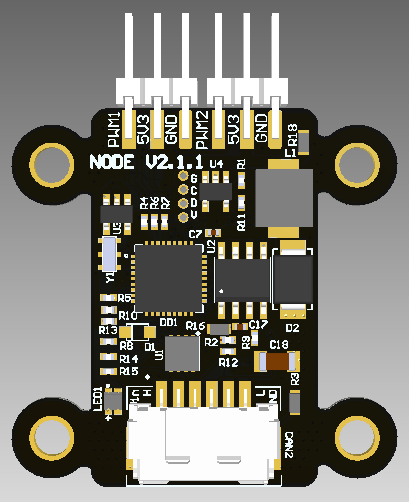
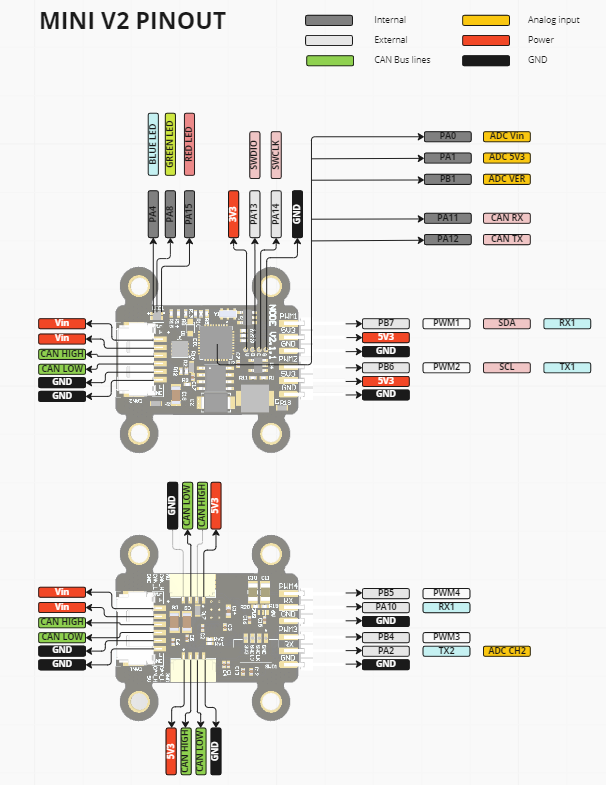
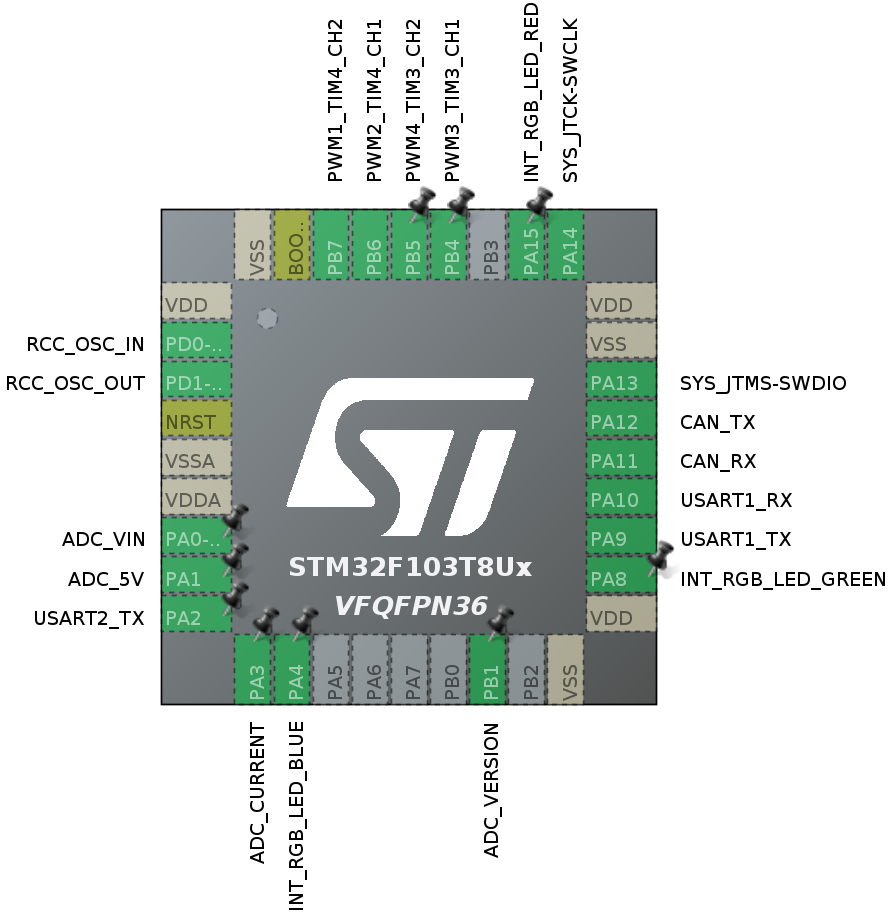
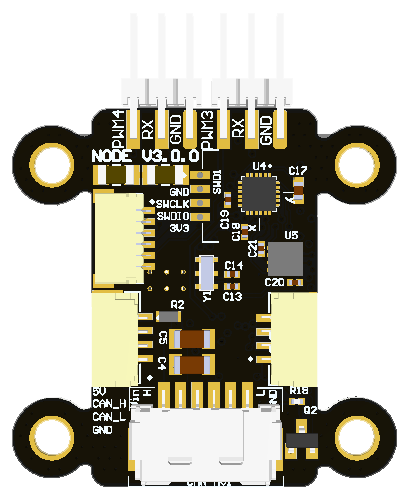
The software supports RL v2 nodes (stm32f103, 128 KBytes flash) and v3 nodes (stm32g0b1, 512 KBytes flash).
| Name | View | Pinout | STM32CubeMX |
|---|---|---|---|
| Mini v2 stm32f103 128 KBytes flash |
 |
 |
 |
| Mini v3 stm32g0b1 512 KBytes flash |
 |
 |
 |
This node is a versatile device integrating PWM control, IMU sensing, and dual CAN bus communication, suitable for various applications in robotics, drones, and other embedded systems. Below are the detailed use cases for different scenarios.
| Use case | Description |
|---|---|
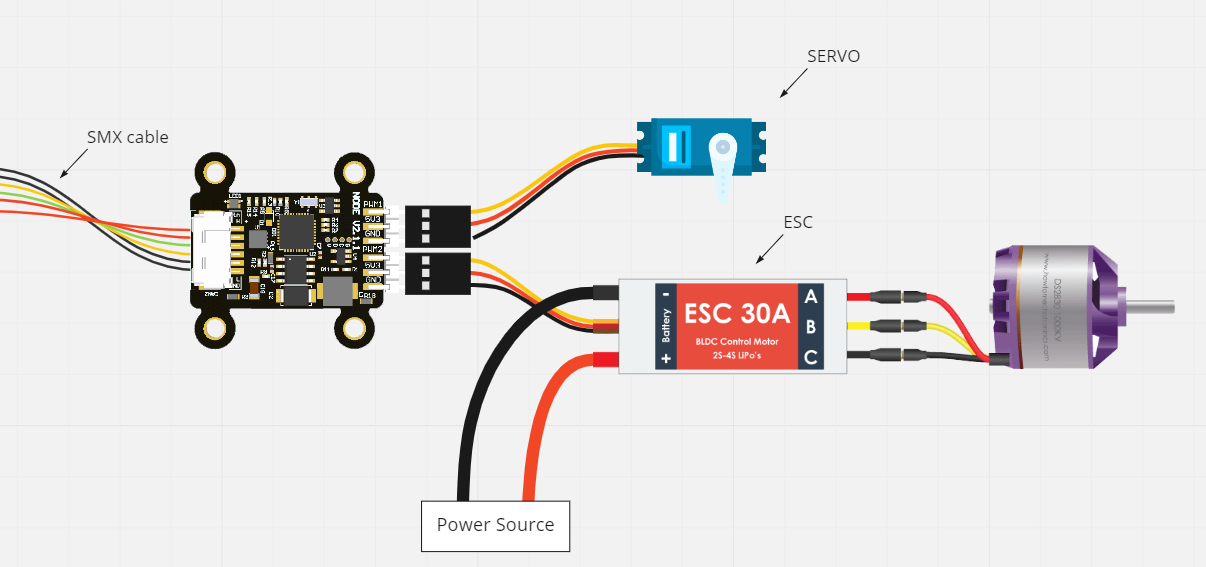 |
1. Basic ESC and Servo Control PWM1-4 to control PWM ESCs via Cyphal/DroneCAN. PWM1-2 to control 5V servos. DroneCAN interface: RawCommand / ArrayCommand. Cyphal/CAN interface: UDRAL setpoint |
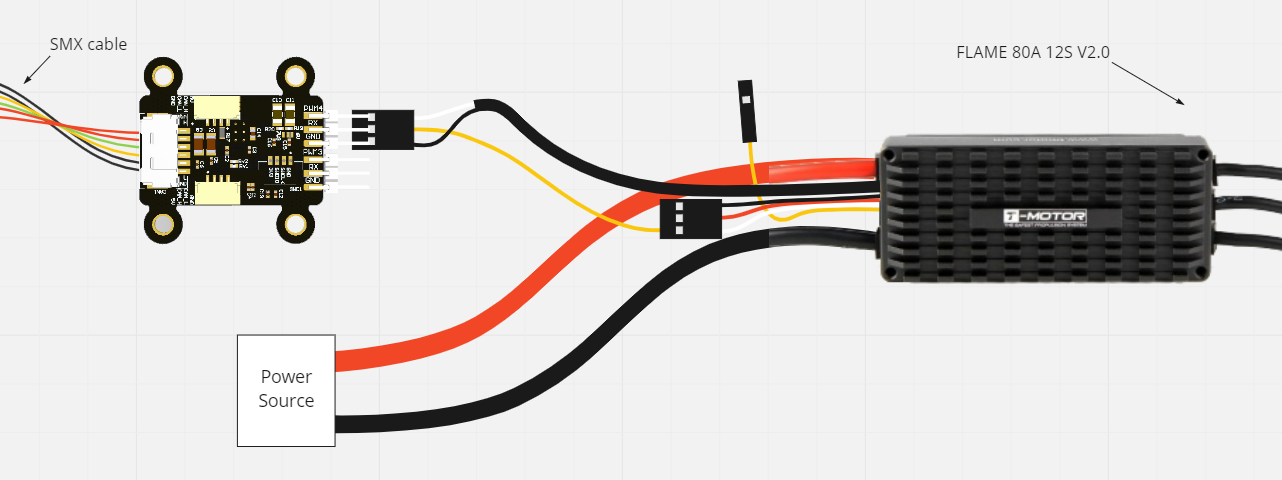 |
2. Advanced ESC Control with Feedback PWM3-4 for controlling PWM ESCs UART or ADC feedback on the FB pin. DroneCAN interface: esc.Status / actuator.Status. Cyphal/CAN interface: UDRAL Feedback |
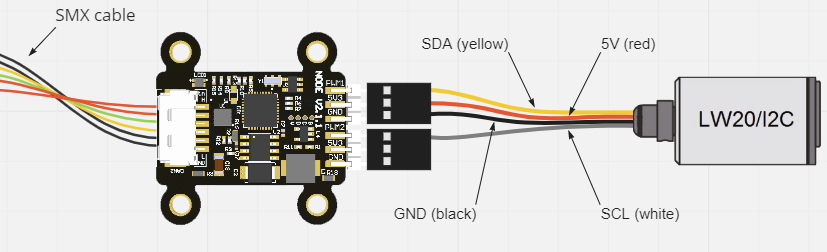 |
3. CAN-I2C Converter PWM1 and PWM2 as I2C pins. Cyphal/DroneCAN adapter for I2C peripherals. DroneCAN examples: range_sensor.Measurement. |
| 4. Cargo Gripper PWM1-2 to control servo-based cargo grippers. UAV payload management systems. DroneCAN interface: hardpoint.Command. |
|
| 5. CAN-CAN converter CAN1 for Cyphal/DroneCAN. CAN2 for another CAN protocol. Cyphal/DroneCAN adapter for another CAN device. Examples: KST/CAN servo, CANopen motor, CAN BMS. Keep a consistent CAN network. Supported only on Mini v3 node. |
|
| 6. Servo Position Estimation with I2C Encoder PWM3-4 for a servo PWM1-2 for a AS5600 I2C encoder. Estimate the angular position of the servo. DroneCAN interface: actuator.Status. |
|
| 7. Vibration Analysis with IMU Utilize the onboard IMU (MPU-9250) Monitor vibrations in your system. Estimate dominant frequency and magnitude of vibrations. Crucial for diagnosing mechanical issues or ensuring smooth operation in drones or robotic platforms. DroneCAN interface: ahrs.RawIMU. |
The following table outlines the compatibility of the project with different operating systems, modes, and support timelines.
| Operating System | DroneCAN Support | Cyphal Support | Notes |
|---|---|---|---|
| Manjaro (latest) | ✅ Supported | ✅ Supported | Latest Manjaro latest version. |
| Ubuntu 24.04 | ✅ Supported | ✅ Supported | Latest Ubuntu LTS version. |
| Ubuntu 22.04 | ✅ Supported | ✅ Supported | Fully supported for both modes. |
| Ubuntu 20.04 | ❌ Not Supported | ❌ Not Supported | Deprecated in 2025-04-15. |
| Windows (2022) | ✅ Supported | ✅ Supported | Current "latest" Windows version. |
Requirements:
- arm-none-eabi-gcc
- CMake
- Python
- STM32CubeMX/STM32CubeIDE
- st-link
Installation (Ubuntu, Manjaro, Windows):
# 1. Make a fork of the repository and clone the repository with submodules
git clone git@github.com:RaccoonlabDev/mini_v2_node.git --recursive

# 2. Install python requirements
pip install -r requirements.txt

# 3. Install other requirements (toolchains, etc.)
./scripts/install.py
Build (examples):
# DroneCAN firmware:
make dronecan_v2
make dronecan_v3

# Cyphal firmware:
make cyphal_v2
make cyphal_v3Upload/Flash:
make dronecan_v2 upload
# or:
make dronecan_v3 upload
SITL (Software-In-The-Loop):
make sitl_dronecan run
# or:
make sitl_cyphal run
GUI Tools
For full interaction with the node use:
The project is organized into three main layers to make it portable across boards:
- Peripheral Layer (Src/peripheral)
- STM32CubeMX-generated HAL code is wrapped in lightweight C++ classes.
- High-level code accesses peripherals only through the
HALnamespace. - Goal: minimize direct dependency on STM32CubeMX and ease migration to other platforms.
- Board Support / Platform Layer (Src/platform)
- Board-specific configuration (pins, ADC channels, LEDs, CAN terminators, etc.).
- High-Level Layer
- Drivers (Src/drivers) — external devices (e.g. IMU).
- Modules (Src/modules) — application logic, e.g. vibration metrics.
- Uses DroneCAN or Cyphal/CAN for communication.
Build Targets
- Build and flash using Make, for example:
make dronecan_v3 - STM32CubeMX is used only to generate peripheral code. Application logic starts in
application_entry_point()called frommain.c.
Standards & Hardware Info
- Boards follow an internal standard for peripherals (ADC_VIN, ADC_5V, ADC_CURRENT, RGB LED, CAN_TERMINATORS, etc.). See docs/hardware.md for hardware details.
All nodes run a minimal application after flashing so you can verify the board is working without extra setup:
- CAN communication starts according to the selected build target (DroneCAN or Cyphal/CAN).
- LED indicator follows a standard pattern common to all Raccoonlab boards (similar to PX4 LED Meanings and Ardupilot LED meanings):
| LED Pattern & Color | Meaning |
|---|---|
| Blinking Blue/Red | Initialization / Calibration |
| Blinking Yellow | Minor Failure / Warning |
| Blinking Magenta | Major Failure / Error |
| Blinking Red | Fatal Malfunction / Critical |
| Blinking Blue | Ready — No GPS Lock |
| Solid Blue¹ | Armed — No GPS Lock |
| Blinking Green² | Ready — 3D Fix (8+ satellites) |
| Solid Green¹² | Armed — 3D Fix (8+ satellites) |
¹ Applicable to nodes that support an armed state (e.g. actuator nodes).
² Applicable to nodes that use GPS (e.g. GNSS or combined nodes).
This repository can be used in two ways:
| Approach | When to Use | Summary |
|---|---|---|
| Fork (recommended) | Use it by default | One fork per user/org |
| Template (advanced) | When multiple apps are needed. | Unlimited repos per user/org, but extra steps to restore history and no automatic pull requests. |
▶ Workflow 1 — Fork (Recommended)
-
Fork this repository on GitHub (top-right “Fork” button).
-
Clone your fork:
git clone git@github.com:<your_org>/mini_v2_node.git --recursive
-
Create your feature branch from the main branch:
git checkout -b pr-my-feature origin/main
-
Push and open pull requests as usual:
git push origin pr-my-feature
✅ This is the simplest and most familiar workflow.
▶ Workflow 2 — Template (Advanced, for Multiple Apps)
-
Create a new repository from this template Click “Use this template” on GitHub → create your own repo.
-
Restore the full commit history with tags from the original repo
git remote add upstream https://github.com/RaccoonlabDev/mini_v2_node.git
git fetch --tags upstream
-
Create your feature branch from the latest available tag
git checkout -b custom-<LATEST_TAG> <LATEST_TAG> # branch named after upstream version
git push origin custom-<LATEST_TAG>
-
Optional: Add a readme branch for extended documentation or onboarding if you want to keep docs separate from code.
git checkout --orphan readme
git rm -rf .
echo "hello there" > README.md
git add README.md
git commit -m "first commit"
git push origin readme
✅ This workflow is ideal if you need multiple independent applications, separate permissions per repo, and still want to keep upstream history.
Custom application versioning
- Recommended format:
v<upstream-version>-<app-version> - Example:
v1.3.0-0.1.0(based on upstreamv1.3.0, app version0.1.0).
If you are struggling with the software building, please refer to the build workflow build_and_deploy.yml for a hint. If it doesn't help, you can open an issue.
Consider the following projects as examples: