API 문서
| 대분류 | 기능 | method | URI |
|---|---|---|---|
| User | 회원가입 | POST | /auth/user |
| 로그인 | POST | /auth/login | |
| 토큰 확인 | POST | /api/token | |
| 이름 수정 | PUT | /api/user | |
| 비밀번호 변경 | PUT | /api/user/password | |
| 정보 조회 | GET | /api/user | |
| Course | 코스 개설 | POST | /api/course |
| 코스 조회(학생) | GET | /api/course/student | |
| 코스 조회(선생) | GET | /api/course/teacher | |
| 코스 정보 | GET | /api/course/{courseId} | |
| 코스 수정 | PUT | /api/course/{courseId} | |
| 코스 삭제 | DELETE | /api/course/{courseId} | |
| 코스 비밀번호 변경 | PUT | /api/course/password | |
| 코스 수강생 추가 | POST | /api/course/student | |
| 코스 강사 변경 | PUT | /api/course/teacher | |
| 코스 비밀번호 확인 | POST | /api/course/password | |
| Lesson | 레슨 목록 | GET | /api/lesson/{courseId} |
| 레슨 개설 | POST | /api/lesson | |
| 레슨명 수정 | PUT | /api/lesson/name/{lessonId} | |
| 레슨 설명 수정 | PUT | /api/lesson/description/{lessonId} | |
| 레슨 삭제 | DELETE | /api/lesson | |
| File | 파일 업로드 | POST | /api/file |
| 파일 다운로드 | POST | /api/file/url | |
| 파일 삭제 | DELETE | /api/file | |
| Participant | 닉네임 변경 | PUT | /api/participant |
- 회원가입
POST /auth/user
| param | type | required | description |
|---|---|---|---|
| body | true | 이메일 | |
| password | body | true | 비밀번호(영어, 숫자 포함 8~20자리 |
| name | body | true | 이름 |
{
    "email": "testing@gmail.com",
    "password": "abcABC123!@#",
    "name": "홍길동"
}- 성공(200)
- 실패(409 Conflict) : 중복된 이메일이 존재하는 경우
- 실패(400 Bad Request)
{
    "exception": "MethodArgumentNotValidException",
    "errors": {
        "password": "비밀번호는 영어와 숫자로 포함해서 8~20자리 이내로 입력해주세요."
    }
}
- 사용자의 정보로 로그인한다.
POST /auth/login
| param | type | required | description |
|---|---|---|---|
| body | true | 이메일(아이디) | |
| password | body | true | 비밀번호 |
{
   "email" : "test@gmail.com",
   "password" : "1q2w3eQWE!@#"
}- 성공
200 OKtext/plaineyJhbGciOiJIUzI1NiJ9.eyJpYXQiOjE2NDg1NDA3NjYsImV4cCI6MTY1MTEzMjc2Niwic3ViIjoiMzI5QG5hdmVyLmNvbSJ9.nN_yyOcOwLncc-OHPMRBXdngtTHaOdEJulG5_HHKRq0 - 실패
401 Unauthorizedapplication/json{ "code": "401", "message": "자격 증명에 실패하였습니다." }
- localStorage에 담아서 다음 요청부터 Authorization에 Bearer Token으로 보내주세요.
const accessToken = localStorage.getItem("ACCESS_TOKEN");
  if (accessToken && accessToken !== null) {
    headers.append("Authorization", "Bearer " + accessToken);
  }
- 토큰의 정보들을 확인한다.
POST /auth/token
{
"token":"eyJhbGciOiJIUzI1NiJ9.eyJpYXQiOjE2NDkwNzAxMjgsImV4cCI6MTY1MTY2MjEyOCwic3ViIjoic3R1ZGVudDFAbmF2ZXIuY29tIn0.rZID5ekTVeitq7Azql8xffGqjL_LXHzORndLuIbT45o"
}- 성공(200)
{
    "userId": 101,
    "email": "teacher1@naver.com",
    "errorMsg": null,
    "issuedAt": "2022-05-17T07:31:07.000+00:00",
    "expiredAt": "2022-06-16T07:31:07.000+00:00",
    "valid": true
}- 실패
JWT expired at 2022-05-04T20:02:08Z. Current time: 2022-05-17T18:49:27Z, a difference of 1118839319 milliseconds. Allowed clock skew: 0 milliseconds.
- 이름을 변경한다.
PUT /api/user
| param | type | required | description |
|---|---|---|---|
| name | body | true | 변경할 이름 |
{
    "name" : "로니콜먼"
}- 성공(200)
- 비밀번호를 변경한다.
PUT /api/user/password
| param | type | required | description |
|---|---|---|---|
| currentPassword | body | true | 현재 비밀번호 |
| newPassword | body | true | 변경할 비밀번호 |
| checkPassword | body | true | 확인용 비밀번호 |
{
    "currentPassword" : "aaaAAA!@#",
    "newPassword" : "bbbBBB!@#",
    "checkPassword" : "bbbBBB!@#",
}- 성공(200)
- 유저의 정보 조회
GET /api/user
- None
- 성공(200)
{
    "userId": 101,
    "name": "teacher1",
    "email": "teacher1@naver.com"
}- 일단 개설한 사람이 teacher로 설정됨
POST /api/course
| param | type | required | description |
|---|---|---|---|
| name | body | true | 코스 이름 |
| password | body | true | 코스 비밀번호 |
| description | body | true | 코스 설명 |
{
    "name": "컴퓨터 공학 종합 설계",
    "password": "1234",
    "description": "컴퓨터 공학과 졸업작품"
}- 성공(200)
- 내가 학생인 코스 리스트 가져오기
GET /api/course/student
- None
[
    {
        "courseId": 26,
        "name": "코스26",
        "description": "설명26",
        "role": "student"
    },
    {
        "courseId": 9,
        "name": "코스9",
        "description": "설명9",
        "role": "student"
    }
]- 내가 강사인 코스 리스트 가져오기
GET /api/course/teacher
- None
[
    {
        "courseId": 21,
        "name": "코스21",
        "description": "설명21",
        "role": "teacher"
    },
    {
        "courseId": 10,
        "name": "코스10",
        "description": "설명10",
        "role": "teacher"
    }
]- 수업정보와 참여자 정보 가져오기
GET /api/course/{courseId}
- None
{
    "teacherEmail": "teacher1@naver.com",
    "teacherName": "teacher1",
    "courseId": 21,
    "name": "코스21",
    "description": "설명21",
    "participants": [
        {
            "userId": 101,
            "email": "teacher1@naver.com",
            "name": "teacher1"
        },
        {
            "userId": 100,
            "email": "student100@naver.com",
            "name": "student100"
        },
        {
            "userId": 99,
            "email": "student99@naver.com",
            "name": "student99"
        },
        {
            "userId": 98,
            "email": "student98@naver.com",
            "name": "student98"
        },
        {
            "userId": 97,
            "email": "student97@naver.com",
            "name": "student97"
        },
        {
            "userId": 96,
            "email": "student96@naver.com",
            "name": "student96"
        },
        {
            "userId": 95,
            "email": "student95@naver.com",
            "name": "student95"
        }
    ]
}- 코스를 수정한다.
PUT /api/course/{courseId}
| param | type | required | description |
|---|---|---|---|
| name | body | false | 수정할 이름 |
| description | body | false | 수정할 설명 |
{
   "name" : "새로운 수업명",
   "description": "새로운 설명"
}-
성공(200)
-
실패(403)
- 코스를 삭제한다.
DELETE /api/course/{courseId}
- None
- 성공(200)
- 코스 비밀번호 변경
PUT /api/course/password
{
   "courseId" : 21,
   "password" : "1234"
}- 성공(200)
- 코스에 수강생을 추가한다.
POST /api/course/student
| param | type | required | description |
|---|---|---|---|
| emails | body | true | 추가할 학생 이메일 목록 |
| courseId | body | true | 코스 pk |
{
    "emails" : ["student59@naver.com","student49@naver.com","student57@naver.com"],
    "courseId" : 21
}- 성공(200)
- 강사 변경
PUT /api/course/teacher
| param | type | required | description |
|---|---|---|---|
| courseId | body | true | 코스 pk |
| teacherEmail | body | true | 바꿀 강사 이메일 |
{
    "courseId" : 21,
    "teacherEmail" : "teacher2@naver.com"
}- None
- 수강생이 비밀번호 알면 강의수강 가능
POST /api/course/password
{
    "courseId" : 1,
    "password" : "1234"
}- 비밀번호 맞았을 때(200)
{
    "valid": true
}- 비밀번호 틀렸을 때(200)
{
    "valid": false
}- 레슨 목록 가져오기
GET /api/lesson/{courseId}
- None
[
    {
        "lessonId": 1,
        "courseId": 21,
        "name": "새로운 레슨",
        "description": "설명",
        "fileUrl": null
    },
    {
        "lessonId": 2,
        "courseId": 21,
        "name": "새로운 레슨2",
        "description": "설명2",
        "fileUrl": null
    }
]- 레슨 개설하기
POST /api/lesson
| param | type | required | description |
|---|---|---|---|
| name | body | true | 코스 이름 |
| courseId | body | true | 코스 pk |
| description | body | true | 코스 설명 |
| lang_image_id | body | true | 언어설정 |
{
    "name": "새로운 레슨2",
    "description" : "설명2",
    "courseId" : 21,
    "lang_image_id": 1
}- 성공(200)
- 레슨명 수정하기
PUT /api/lesson/name/{lessonId}
| param | type | required | description |
|---|---|---|---|
| name | body | true | 수정할 이름 |
{
    "name" : "메서드와 문자열"
}- 성공(200)
- 레슨 설명 수정하기
PUT /api/lesson/description/{lessonId}
| param | type | required | description |
|---|---|---|---|
| description | body | true | 수정할 설명내용 |
{
    "description" : "이번주는 휴강합니다."
}- 성공(200)
- 레슨 삭제하기
DELETE /api/lesson/{lessonId}
- none
- 성공(200)
- 수업 템플릿 파일 업로드(선생만 업로드 가능)
POST /api/file
-
.zip파일만 허용 -
form-data로 보내야함
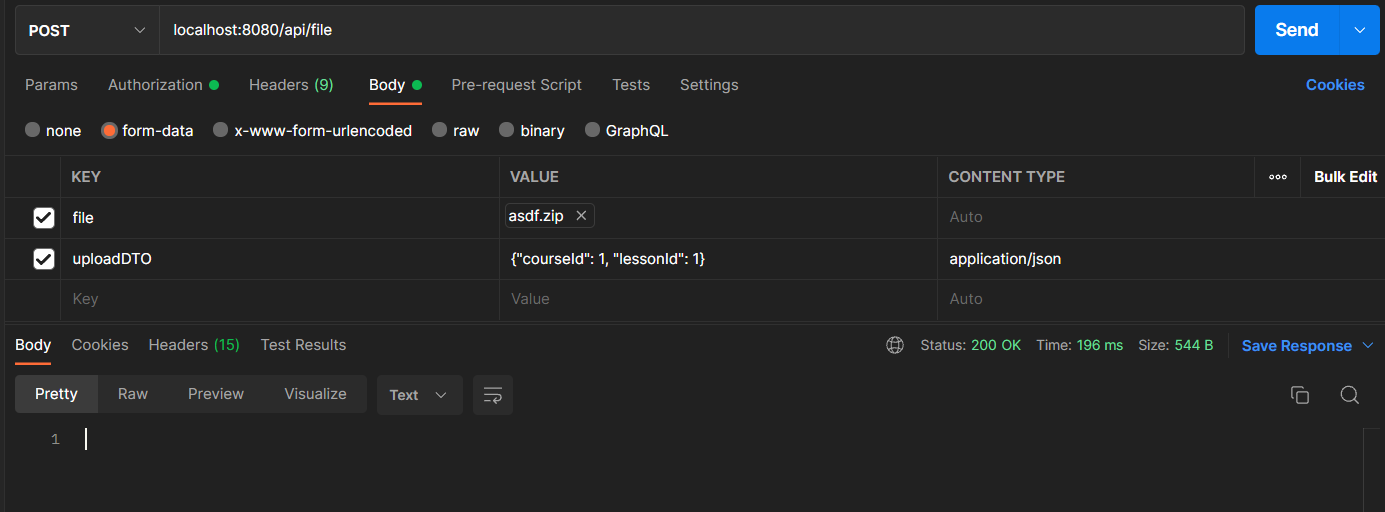
- 리액트 예시
const onCreate = () => {
    let formData = new FormData()

    formData.append("file", files[0])

    let variables = [{
      courseId: 1,
      lessonId: 1
    }]

    formData.append("uploadDTO", new Blob([JSON.stringify(variables)], {type: "application/json"}))

    Axios.post("/api/file", formData)
  }
- 성공(200)
- 실패(403)
"message" : "권한이 없습니다."- S3의 Presigned URL(7일) 반환
POST /api/file/url
| param | type | required | description |
|---|---|---|---|
| fileUrl | body | true | 파일경로 |
| lessonId | body | true | 레슨 pk |
{
    "fileUrl" : "course/1/1/asdf.zip",
    "lessonId" : 1
}https://together-coding-assets.s3.ap-northeast-2.amazonaws.com/?X-Amz-Algorithm=AWS4-HMAC-SHA256&X-Amz-Date=20220527T061337Z&X-Amz-SignedHeaders=host&X-Amz-Expires=604799&X-Amz-Credential=ASLKJDKLWI%289347239487%2Fap-northeast-2%2Fs3%2Faws4_request&X-Amz-Signature=8b747585adf2398472893d58eaddef07c77819f3a144ddbae06e5a16511f65bd931- 레슨의 파일 삭제
DELETE /api/file
| param | type | required | description |
|---|---|---|---|
| fileUrl | body | true | 파일경로 |
| lessonId | body | true | 레슨 pk |
{
    "fileUrl" : "course/1/1/asdf.zip",
    "lessonId" : 1
}- 성공(200)
- 실패(403)
"message" : "권한이 없습니다."- 코스의 닉네임 변경
PUT /api/participant
| param | type | required | description |
|---|---|---|---|
| courseId | body | true | 코스 pk |
| nickname | body | true | 수정할 닉네임 |
{
   "courseId" : 21,
   "nickname" : "침착맨"
}- 성공(200)
- 성공(200)