Visual, production-ready AI workflows — portable as JSON


Features · Quick Start · Usage · Development · Support
Click to watch the demo video
“AI agent workflows keep turning into scattered scripts that nobody can reproduce…” “The prototype worked, but it breaks when handed off to the team…” “I want to build with nodes, but it never lands in a form that's actually operable…”
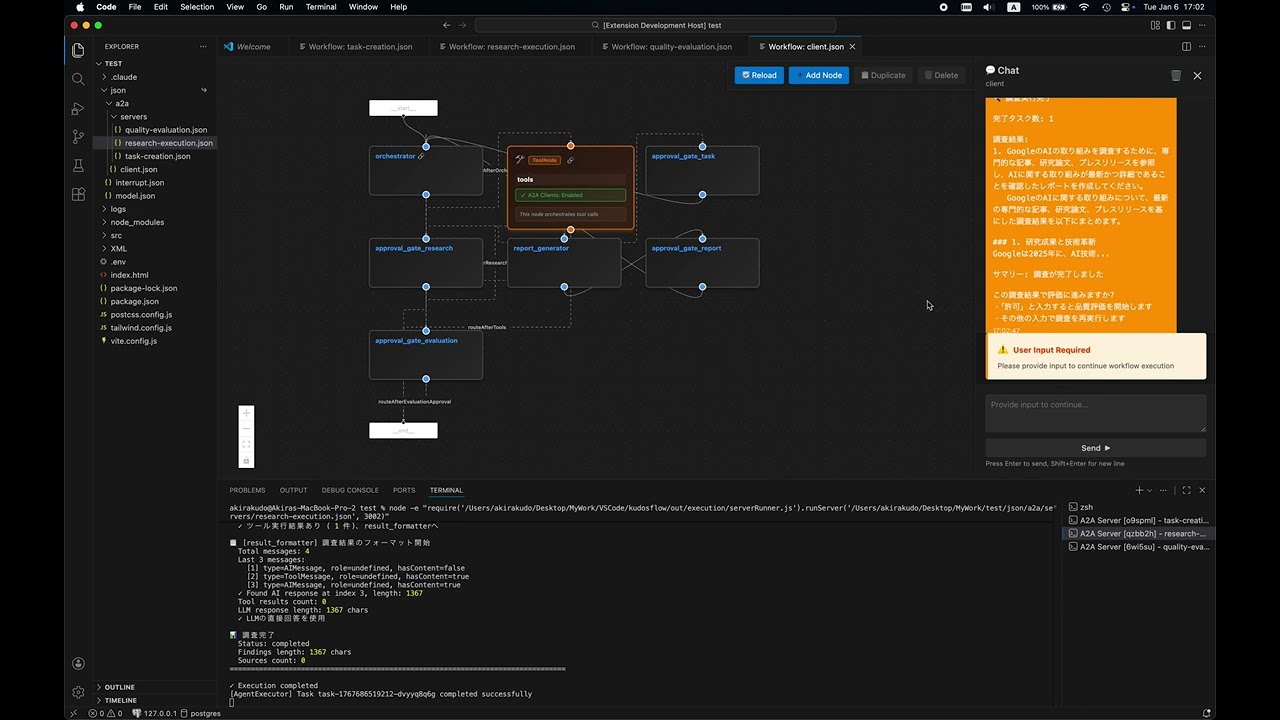
Kudosflow is a VSCode extension that lets you design and execute node-based AI agent workflows using a drag-and-drop UI — right inside your editor. Workflows are saved as portable JSON, so version control, sharing, and production execution are all in one straight line.
- Specs live as a visual overview, not buried between lines of code
- Workflows are JSON, making review, diff management, and reuse straightforward
- The same artifact takes you from prototype to production
- Visual First: See your entire workflow at a glance — no more scattered scripts
- Production Ready: Go from prototype to production with the same JSON — minimize rewrites
- Portable: Manage and share AI logic as standard JSON with Git
- Integrated: Everything stays inside VSCode — supports A2A and MCP protocols
- 🎨 Visual Workflow Editor: Drag-and-drop interface powered by React Flow
- 🔌 Node-Based Architecture: Connect nodes to build complex AI agent workflows
- 💾 JSON Storage: Workflows stored as portable JSON files in your workspace
- 🔄 A2A & MCP Integration: Support for Agent-to-Agent and MCP communication protocols
- 🔧 System Skills Integration: Comprehensive support for System Skills with visual indicators and centralized management
- 🤖 Advanced AI Models: Powered by GPT-5.2 for enhanced performance
- 🎯 Context Menu Integration: Right-click any JSON file to open in workflow editor
- 🚀 Live Execution: Real-time workflow execution and testing
- 🧵 State Management: Thread-based conversation persistence across requests
- VSCode 1.96.0 or higher
- API keys for your AI providers (OpenAI, Anthropic, or Ollama)
code --install-extension kudosflow2-1.3.0.vsixSearch for "Kudosflow2" in the VSCode extensions marketplace.
The extension package includes the following folders that provide workflows, scripts, and skills:
| Folder | Description |
|---|---|
json/ |
Sample workflow JSON files and agent configurations |
scripts/ |
Utility scripts for A2A server and messaging |
skills/ |
Agent skill definitions (e.g., Teams, Arxiv Search) |
These folders are located inside the installed extension directory:
~/.vscode/extensions/akirakudo911.kudosflow2-1.3.0/
├── json/
├── scripts/
└── skills/
To use them in your project, copy or symlink them to your project root:
Copy:
cp -r ~/.vscode/extensions/akirakudo911.kudosflow2-1.3.0/json ./json
cp -r ~/.vscode/extensions/akirakudo911.kudosflow2-1.3.0/scripts ./scripts
cp -r ~/.vscode/extensions/akirakudo911.kudosflow2-1.3.0/skills ./skills
Symlink (macOS/Linux):
ln -s ~/.vscode/extensions/akirakudo911.kudosflow2-1.3.0/json ./json
ln -s ~/.vscode/extensions/akirakudo911.kudosflow2-1.3.0/scripts ./scripts
ln -s ~/.vscode/extensions/akirakudo911.kudosflow2-1.3.0/skills ./skills-
Configure API Keys
Create a
.envfile in your project root:# OpenAI (optional) OPENAI_API_KEY=your_openai_api_key_here # Anthropic (optional) ANTHROPIC_API_KEY=your_anthropic_api_key_here # Ollama (optional, local) OLLAMA_BASE_URL=http://127.0.0.1:11434
-
Explore Sample Workflows
Sample workflows are automatically installed to:
~/.vscode/extensions/akirakudo911.kudosflow2-1.3.0/json/Basic Examples:
interrupt.json- Interactive workflow with user interruptsmodel.json- Career counselor with OpenAI integration
A2A Examples:
a2a/client.json- A2A client workflowa2a/servers/task-creation.json- Task creation servera2a/servers/research-execution.json- Research execution servera2a/servers/quality-evaluation.json- Quality evaluation server
Three ways to open:
- From Explorer: Right-click any
.jsonfile → "Open Workflow Editor" - Command Palette:
Ctrl+Shift+P(orCmd+Shift+P) → "Kudosflow: Open Workflow Editor" - Create New: Right-click a folder → "Create New Workflow Here"
- Click the + button to add nodes to the canvas
- Drag nodes to position them on the canvas
- Connect nodes by dragging from output anchors (right) to input anchors (left)
- Configure each node by clicking it and editing parameters
- Save your workflow using the Save button in the toolbar
- Execute your workflow using the Run button
Task Creation → Approval → Research Execution → Approval
  → Report Generation → Report Approval → Quality Evaluation → Complete
Each step can be an independent agent workflow, communicating via A2A protocol.
Kudosflow supports stateful conversations using thread IDs:
- thread_id: Optional parameter for maintaining conversation state
- State Persistence: Same thread_id retrieves previous context
- Fresh Start: Omit thread_id to start a new conversation
# Start new conversation (no thread_id)
curl -X POST http://localhost:3000/message/send \
  -H "Content-Type: application/json" \
  -d '{
    "message": {"parts": [{"type": "text", "text": "Research the AI market"}]}
  }'
# Response includes: thread_id: "thread-1234567890-abc123"

# Continue conversation (with thread_id)
curl -X POST http://localhost:3000/message/send \
  -H "Content-Type: application/json" \
  -d '{
    "message": {"parts": [{"type": "text", "text": "Approved"}]},
    "thread_id": "thread-1234567890-abc123"
  }'
# State is preserved, context maintainedThe Agent Teams feature dynamically assembles a team of specialist agents at runtime based on any user prompt. Workers run in parallel as native LangGraph nodes (fan-out/fan-in) — no external processes, no port management.
- Open
json/teams/leader.jsonin the Workflow Editor (right-click → "Open Workflow Editor") - Run the workflow and enter your prompt (any domain — research, writing, analysis, etc.)
- Workers execute in parallel and results are integrated automatically
- When complete, you will be prompted to confirm the final report
User Prompt
    │
    ▼
┌───────────────┐
│ planner_node  │  Analyzes task → outputs JSON array of worker definitions
└──────┬────────┘
       │ Send(worker_A), Send(worker_B), Send(worker_C)  ← fan-out
       ├──────────────────────┬─────────────────────────┐
       ▼                      ▼                         ▼
┌─────────────┐       ┌─────────────┐           ┌─────────────┐
│ worker_node │       │ worker_node │    ...     │ worker_node │  (parallel)
└──────┬──────┘       └──────┬──────┘           └──────┬──────┘
       └──────────────────────┴─────────────────────────┘
                              │ fan-in
                              ▼
                   ┌──────────────────┐
                   │ aggregator_node  │  Merges all worker results → final report
                   └────────┬─────────┘
                            ▼
                   ┌──────────────────┐
                   │  finalize_node   │  Presents report + confirmation prompt
                   └──────────────────┘
| Node | Role |
|---|---|
planner_node |
Analyzes the prompt and outputs a workerPlans array (name, role, task) |
worker_node |
Executes each worker's task independently and in parallel via LangGraph Send |
aggregator_node |
Collects all workerResults and synthesizes an integrated finalReport |
finalize_node |
Presents the final report and prompts user for confirmation |
| File | Role |
|---|---|
json/teams/leader.json |
Workflow definition (planner → worker×N → aggregator → finalize) |
To verify that Agent Teams works correctly across different domains, the following test prompts are provided.
Each test case checks the following:
| Item | How to Verify |
|---|---|
| Correct number of workers planned | Check workerPlans count in execution logs |
| Role names are domain-appropriate | Review name field in planner output |
| Workers executed in parallel | Confirm multiple worker_node entries appear concurrently in logs |
| Each worker produced a result | Check workerResults array in aggregator input |
| Final report includes all worker outputs | Review finalReport content |
| ID | Domain | Prompt Summary | Expected Workers |
|---|---|---|---|
| T-01 | Marketing Research | Survey Japan's streaming video market (players, pricing, users, forecast) | market_researcher, competitor_analyst, user_analyst |
| T-02 | Academic Survey | Summarize LLM fine-tuning trends since 2023 (LoRA, QLoRA, DPO) | literature_reviewer, technique_comparator, application_analyst |
| T-03 | Travel Planning | 5-day Tokyo → Kyoto/Osaka itinerary with transport, lodging, food | sightseeing_planner, logistics_coordinator, food_curator |
| T-04 | Content Creation | Blog post: "10 ways to boost remote work productivity" with SEO | seo_researcher, content_writer, editor |
| T-05 | Data Analysis | Design an e-commerce analytics framework (RFM, churn prediction) | data_architect, segmentation_specialist, ml_engineer |
| T-06 | Legal / Compliance | Explain key components of a SaaS Terms of Service | legal_analyst (1 worker expected — simple task) |
| T-07 | Code Generation | Implement formatDateJP(date: Date): string in TypeScript with Jest tests |
implementer, tester |
T-07 pass/fail criterion:
yarn jest src/formatDateJP.test.ts— all tests must pass.
# 1. Open leader.json in the Workflow Editor
# 2. Enter the test prompt and run
# 3. Review the final report presented by finalize_node- Node.js 20.x or higher
- Yarn package manager (not npm)
- VSCode 1.96.0 or higher
# Install all dependencies (extension + webview)
yarn install:all

# Copy environment example
cp .env.example .env
# Edit .env with your API keys# Compile TypeScript for extension
yarn compile
# Watch mode for extension development
yarn watch
# Start webview development server with hot reload
yarn start:webview
# Build webview for production
yarn build:webview
# Package extension
yarn package
# Run linter
yarn lint
# Run tests
yarn pretest- Press
F5in VSCode to launch the Extension Development Host - Make changes to extension code →
yarn compile→ Reload window (Ctrl+R) - For webview changes, run
yarn start:webviewfor hot reload
The extension uses a two-part architecture:
1. Extension Side (Node.js context)
- Entry: src/extension.ts
- Build: TypeScript →
out/directory - Manages VSCode extension lifecycle and webview panel
2. Webview Side (Browser context)
- Entry: webview-ui/src/index.tsx
- Build: Vite + React →
webview-ui/build/directory - Contains the React Flow canvas UI
Communication between extension and webview uses message passing via postMessage API.
- OpenAgentJson - JSON schema definitions for agent workflows
- a2a-server - Agent-to-Agent communication server
- SceneGraphManager - Scene graph management library (Private repository)
Contributions are welcome! Please feel free to submit a Pull Request.
MIT License - see LICENSE for details.
Hand-crafted by Akira Kudo in Tokyo, Japan
Copyright © 2023-present Akira Kudo