A customized, Armbian-based Linux system designed to launch OpenHamClock in a dedicated kiosk mode on the Banana Pi M4 Zero.
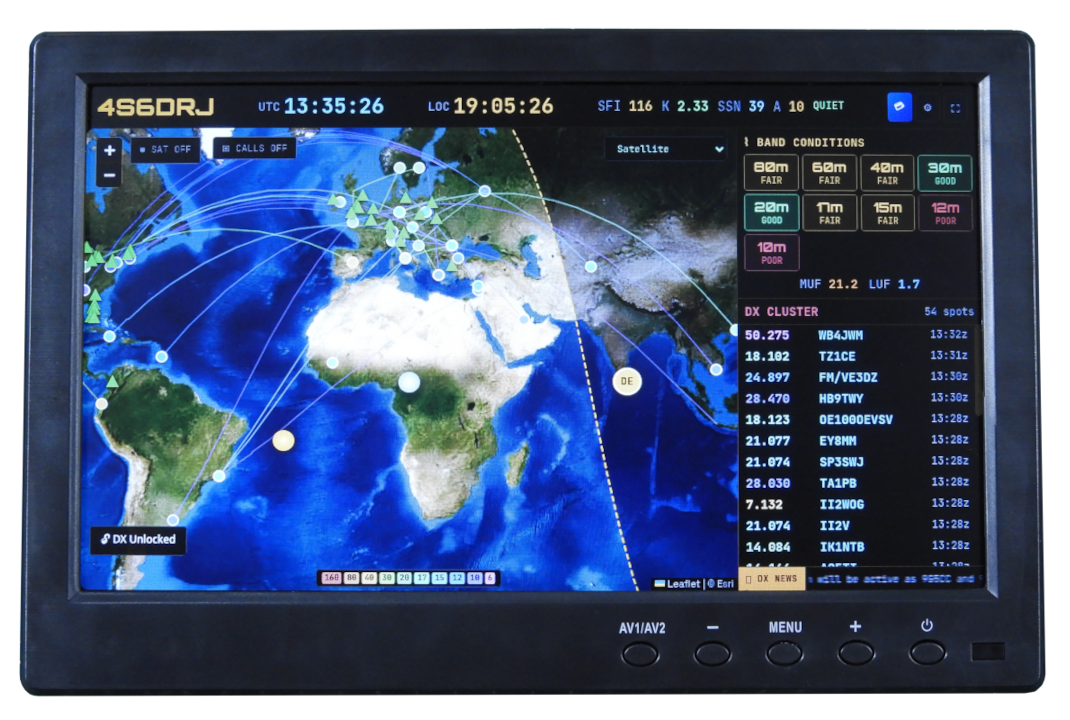
This image is built on the X Window System using the Openbox window manager and Chromium. It is engineered for a "plug-and-play" experience - once flashed, it requires no user interaction, keyboard, or mouse to function. WiFi and system localization are pre-configured at build time for seamless deployment.
For a smooth build process, we recommend using a Linux environment (the prototype was developed on Ubuntu 24.04 LTS).
| Component | Minimum Requirement |
|---|---|
| RAM | 8GB or more |
| Storage | ~50GB free disk space |
| Architecture | x86-64, ARM64, or RISC-V |
| Privileges | Superuser (sudo) access |
git clone https://github.com/dilshan/openhamclock-kiosk.git
cd openhamclock-kioskBefore building, you must define your network and regional settings in userpatches/customize-image.sh
-
WiFi SSID: Search for
[wifi]and update thessidfield. -
WiFi Password: Search for
[wifi-security]and update thepskfield. -
Timezone: Search for
/etc/localtimeand update the symlink to your IANA Time Zone. Example:ln -sf /usr/share/zoneinfo/Asia/Colombo /etc/localtime -
Hostname & Root Password (optional): You can modify these in the script. To generate a secure password hash, use:
openssl passwd -6 "YOUR_NEW_PASSWORD" -
Server URL: Update the
userpatches/overlay/openbox-autostartfile. The default URL is set tohttp://192.168.1.130:3000. -
Further Customizations: For any additional system tweaks, please consult the Armbian documentation.
Execute the compile script:
./compile.sh bpim4zero-openhamclockIMPORTANT
During the process, the Linux kernel menuconfig interface will appear. We highly recommend keeping all settings at their default values. An active internet connection is required throughout the build.
Once the build finishes, navigate to the output directory:
cd output/imagesInsert a 4GB or 8GB SD card into your build PC. Identify its device path (e.g., /dev/sdX) and run the following command.
WARNING
This will permanently delete all data on the SD card. Ensure
of=/dev/sdXpoints to the correct drive.
sudo dd if=Armbian-unofficial_26.02.0-trunk_Bananapim4zero_trixie_current_X.XX.XX_minimal.img of=/dev/sdX bs=1M status=progress conv=fsyncUnmount the SD card, insert it into your Banana Pi M4 Zero, and power it on. The system will automatically boot into OpenHamClock.
The 2GB RAM version of the Banana Pi M4 Zero features 8GB of onboard eMMC, which provides more than enough space to host the OpenHamClock kiosk operating system. To flash the image to the internal storage, follow the steps below:
- Download the Banana Pi M4 Zero Desktop OS image from the Armbian website, specifically recommending the Debian image with the Cinnamon desktop environment.
- Flash this initial OS image onto an SD card using the
ddcommand, ensuring you target the correct drive (e.g.,/dev/sdb).
sudo dd if=./Armbian_25.8.1_Bananapim4zero_trixie_current_6.12.35_cinnamon_desktop.img of=/dev/sdb bs=1M status=progress conv=fsync- Insert the SD card into the Banana Pi M4 Zero and boot the board, making sure to configure the Wi-Fi connection during the initial setup process.
- Once the board is booted and connected to your network, find its IP address by running the
ip addrcommand. - From your host machine, transfer the OpenHamClock kiosk operating system image to the Banana Pi using the
scpcommand.
scp ./Armbian-unofficial_26.02.0-trunk_Bananapim4zero_trixie_current_6.12.73_minimal.img <USERNAME>@<BOARD-IP-ADDRESS>:~/- Identify the eMMC device mapping on the Banana Pi using the
lsblkcommand, noting that the internal disk will appear without mount points (typically asmmcblk2). - Flash the OpenHamClock image directly into the internal eMMC using the
ddcommand.
sudo dd if=./Armbian-unofficial_26.02.0-trunk_Bananapim4zero_trixie_current_6.12.73_minimal.img of=/dev/mmcblk2 bs=1M status=progress conv=fsync- After the transfer is complete, safely power down the board by running
sudo shutdown now. - Eject the SD card from the slot to ensure the board boots from internal storage on the next cycle.
- Power the board back on, and the OpenHamClock kiosk OS will start automatically from the built-in eMMC.