Bioimage segmentation in the field of synthetic biology and life sciences is a common but challenging task, especially in dealing with complex biological properties due to highly dense systems, high variation in shapes and sizes, and complex morphology. This challenge is magnified working with organoids, as one of the major bottlenecks in analysis is with processing large amounts of microscopy image data. However, due to the sizes and shapes of organoids varying greatly over different time points, drug treatment types, and cell types, there have been challenges in developing a high-throughput screening workflow that could be generalized for all types of organoids.
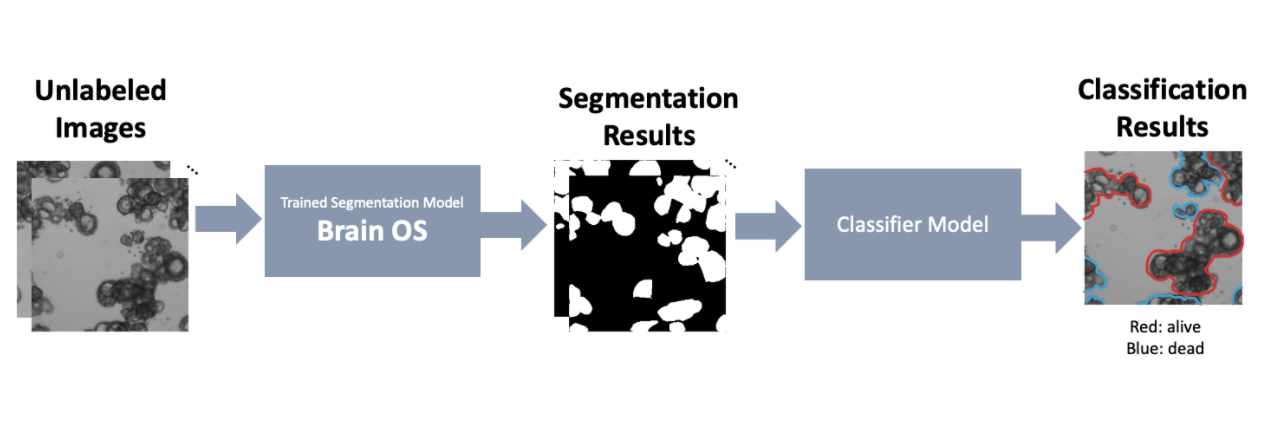
Such a need for an accurate and generalizable pipeline to analyze and extract quantitative measurements from organoid scans motivated us to develop Organoid Profiler, a deep learning (DL)-based suite for a complete end-to-end organoid analysis. Organoid Profiler is composed of two major components - a trained segmentation model (Brain OS) and a trained classifier model. We have currently developed Brain OS (Organoid Segmentation), a DL-based segmentation model for organoid-based segmentation. While Brain OS allows the user to extract quantitative measurements from the images - such as the surface area of each individual organoid - Brain OC (Organoid Classifier), the second part of Organoid Profiler, performs classification tasks to label the segmented organoids depending on their liability. During the second phase of our project, we will be developing the Brain OC classifier model and completing the Organoid Profiler pipeline. Once completed, Ogranoid Profiler allows us to quickly screen results of glioma drug screenings and identify hopeful candidates for clinical trials. In this section, we focus on the segmentation pipeline.
Running the pretrained model
- Download the pretrained model from https://drive.google.com/file/d/1Dl7BczvxStkL0pjoeS2R42kFP-9Kv860/view?usp=sharing
- Preprocess the images that you’d like to segment to 256x256 tiles or use the sample images given
- If you are simply using the provided sample images(sample images folder) to test the model and generate prediction, use this Colab notebook(https://colab.research.google.com/drive/1jgdtu-j37gEE9wFsT6UICqK6rzxihpkW?usp=sharing) or training/gen_preds.ipynb. We recommend using Colab as the environment is easier to setup and allows access to GPU for all users. Simply download the provided sample images and replace the locations for the images and model to the location of the files.
- Using training/gen_preds.ipynb, generate prediction on the images
Training your own model
- Prepare the dataset and the corresponding masks. You can either generate your ground truth annotations manually (we recommend using Piximi annotator https://www.piximi.app/ or other annotation tools such as ImageJ or QuPath). If you wish to create such “ground truth” labels using pre-trained models, we suggest that you look into Stardist, CellPose, or CellProfiler depending on the characteristics of your specific dataset.
- Preprocess the images and the masks to 256x256 tiles and generate a .pytable for training and validation using preprocessing/make_hdf5.ipynb.
- Train the model using training/organoids_unet.ipynb. The code is optimized for the Google Colab environment which we recommend.
- Process the test dataset and apply the trained model to generate predictions on new data. You’re done!
*For further assistance in using the software or data specific issues, please contact us!