This document is a hands-on, step-by-step deployment guide for building a minimal yet production-ready Kubernetes cluster for enterprise needs. It’s designed to get you from zero to a robust, highly available cluster—on-premises, in the cloud, or across hybrid environments—using only essential, open-source tools.
- Scope: Focuses on the critical path for initial, repeatable cluster deployment—leaving advanced integrations (security, backup, monitoring) for your organization to tailor.
- Audience: Ideal for operators, engineers, and teams who want full control, transparency, and a solid foundation for further enterprise enhancement.
- What You’ll Build: A working cluster using containerd, kubeadm, kube-vip, Cilium, and other cloud-native essentials, ready for your workloads and future expansion.
You will build a platform with:
- containerd as the container runtime (CRI)
- kubeadm for Kubernetes bootstrapping and management
- kube-vip for a highly available virtual IP (VIP) endpoint for the control plane
- Cilium as the CNI and service mesh, providing eBPF-powered networking, security, and observability
Note: This is intentionally not a “kitchen sink” reference. It’s your launchpad. Use it as a base for your own best practices.
- Minimal, robust cluster foundation: Simple, reproducible, and reliable Kubernetes deployment using open-source, cloud-native tools.
- Scalable & flexible: Supports on-premises, cloud, and hybrid; multi-cluster and multi-region ready.
- Operators who want transparency, automation, and control at every layer.
- Organizations with high-availability, compliance, and observability needs.
⚠️ Note: This guide is intentionally focused on the minimal and essential requirements for a working enterprise-grade Kubernetes platform.
You should further supplement it with organization-specific security, monitoring, and backup/disaster recovery solutions.
Before installing Kubernetes, configure each node for performance and compatibility.
Edit
/etc/hostson every node to include all nodes and the VIP:
192.168.1.200    cluster-endpoint
192.168.1.100    k8s-master-01
192.168.1.101    k8s-worker-01
# ...add more nodes as neededDisable swap and configure required kernel modules and sysctl params:
sudo swapoff -a
sudo sed -i '/ swap / s/^\(.*\)$/#\1/g' /etc/fstab

# Enable kernel modules for containerd networking
cat <<EOF | sudo tee /etc/modules-load.d/containerd.conf
overlay
br_netfilter
EOF

sudo modprobe overlay
sudo modprobe br_netfilter

# Set sysctl params required by Kubernetes
cat <<EOF | sudo tee /etc/sysctl.d/99-kubernetes-k8s.conf
net.bridge.bridge-nf-call-iptables = 1
net.ipv4.ip_forward = 1
net.bridge.bridge-nf-call-ip6tables = 1
EOF

sudo sysctl --system   # Apply sysctl params
sudo reboot now # Reboot to ensure all changes take effectInstall containerd and generate its config:
sudo apt-get update
sudo apt-get install -y ca-certificates curl
sudo install -m 0755 -d /etc/apt/keyrings
sudo curl -fsSL https://download.docker.com/linux/debian/gpg -o /etc/apt/keyrings/docker.asc
sudo chmod a+r /etc/apt/keyrings/docker.asc

# Add Docker's repository to Apt sources:
echo \
  "deb [arch=$(dpkg --print-architecture) signed-by=/etc/apt/keyrings/docker.asc] https://download.docker.com/linux/debian \
  $(. /etc/os-release && echo "$VERSION_CODENAME") stable" | \
  sudo tee /etc/apt/sources.list.d/docker.list > /dev/null

sudo apt-get update
sudo apt install -y containerd.io

# Generate default containerd configuration file
containerd config default | sudo tee /etc/containerd/config.toml >/dev/null 2>&1
Edit
/etc/containerd/config.tomland setSystemdCgroup = true:
sudo vim /etc/containerd/config.toml
# Find the line "SystemdCgroup = false" and change it to "SystemdCgroup = true"
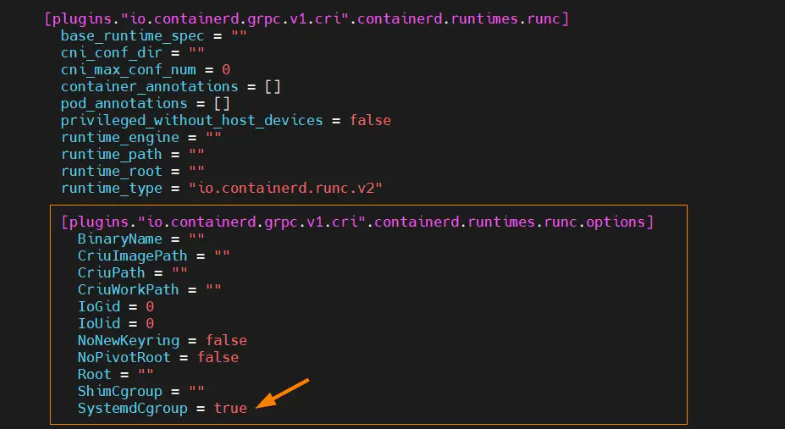
sudo systemctl restart containerd
sudo systemctl enable containerdInstall Kubernetes tools on every node:
export K8S_VERSION=v1.33
sudo apt-get update
sudo apt-get install -y apt-transport-https ca-certificates curl gpg

# Import the Kubernetes APT repository key and repo
curl -fsSL https://pkgs.k8s.io/core:/stable:/$K8S_VERSION/deb/Release.key | sudo gpg --dearmor -o /etc/apt/keyrings/kubernetes-apt-keyring.gpg

echo "deb [signed-by=/etc/apt/keyrings/kubernetes-apt-keyring.gpg] https://pkgs.k8s.io/core:/stable:/$K8S_VERSION/deb/ /" | sudo tee /etc/apt/sources.list.d/kubernetes.list

sudo apt-get update
sudo apt-get install -y kubelet kubeadm kubectl
sudo apt-mark hold kubelet kubeadm kubectl

sudo systemctl enable --now kubelet🛑 All steps in this section must be run as
root.
Set the required environment variables:
export VIP=192.168.1.200      # Set to your cluster VIP
export INTERFACE=ens1         # The network interface to use
export USERNAME=your_user_non_root  # Change as appropriate
Assign the VIP to the network interface:
ip addr add $VIP/24 dev $INTERFACECreate the manifest directory and file:
mkdir -p /home/${USERNAME}/k8s
touch /home/${USERNAME}/k8s/kube-vip.yaml
Download the latest kube-vip version and prepare the manifest generator:
KVVERSION=$(curl -sL https://api.github.com/repos/kube-vip/kube-vip/releases | jq -r ".[0].name")

# Prepare kube-vip alias using containerd's ctr tool
alias kube-vip="ctr image pull ghcr.io/kube-vip/kube-vip:$KVVERSION; ctr run --rm --net-host ghcr.io/kube-vip/kube-vip:$KVVERSION vip /kube-vip"
Generate the DaemonSet manifest for kube-vip:
kube-vip manifest daemonset \
    --interface $INTERFACE \
    --address $VIP \
    --inCluster \
    --taint \
    --controlplane \
    --services \
    --arp \
    --leaderElection | tee /home/${USERNAME}/k8s/kube-vip.yaml
Note:
All the above commands must be executed asroot.
This is required for assigning IP addresses, managing system network interfaces, and running containerd commands.
On the first control-plane (master) node, run:
sudo kubeadm init --skip-phases=addon/kube-proxy --control-plane-endpoint cluster-endpoint --upload-certs Configure kubectl for your user:
mkdir -p $HOME/.kube
sudo cp -i /etc/kubernetes/admin.conf $HOME/.kube/config
sudo chown $(id -u):$(id -g) $HOME/.kube/configApply the kube-vip RBAC and manifest (use the path from previous step):
kubectl apply -f https://kube-vip.io/manifests/rbac.yaml
kubectl apply -f /home/${USERNAME}/k8s/kube-vip.yamlInstall Cilium CLI and deploy Cilium with WireGuard encryption and kube-proxy replacement:
CILIUM_CLI_VERSION=$(curl -s https://raw.githubusercontent.com/cilium/cilium-cli/main/stable.txt)
CLI_ARCH=amd64
CILIUM_VERSION=$(curl -s https://raw.githubusercontent.com/cilium/cilium/main/stable.txt)
if [ "$(uname -m)" = "aarch64" ]; then CLI_ARCH=arm64; fi
curl -L --fail --remote-name-all https://github.com/cilium/cilium-cli/releases/download/${CILIUM_CLI_VERSION}/cilium-linux-${CLI_ARCH}.tar.gz{,.sha256sum}
sha256sum --check cilium-linux-${CLI_ARCH}.tar.gz.sha256sum
sudo tar xzvfC cilium-linux-${CLI_ARCH}.tar.gz /usr/local/bin
rm cilium-linux-${CLI_ARCH}.tar.gz{,.sha256sum}

cilium install --version $CILIUM_VERSION \
  --set encryption.nodeEncryption=true \
  --set encryption.type=wireguard \
  --set kubeProxyReplacement=true

cilium status --wait

# Enable Cilium for L7 policies and proxying:
cilium config set enable-l7-proxy trueCilium Hubble provides deep network visibility and observability for your Kubernetes cluster.
If you already enabled Hubble previously (
cilium hubble enable), you must first temporarily disable it before enabling the UI. The Hubble UI cannot be added at runtime to an already-enabled Hubble deployment.
# If Hubble is already enabled, first disable it
cilium hubble disable

# Now enable Hubble with the UI
cilium hubble enable --ui-
If you run
cilium hubble enable --uiand Hubble UI is already deployed, you will see confirmation messages:🔑 Found existing CA in secret cilium-ca ✨ Patching ConfigMap cilium-config to enable Hubble... ♻️ Restarted Cilium pods ✅ Relay is already deployed ✅ Hubble UI is already deployed -
To access the Hubble UI, use port-forwarding (e.g.
kubectl port-forward -n kube-system svc/hubble-ui 12000:80) and open http://localhost:12000 in your browser.
You now have a minimal, highly available, and enterprise-grade Kubernetes platform
with modern, secure networking, observability, and operational excellence—ready for any workload, anywhere.
🔒 Next Steps:
Add organization-specific monitoring, backup, security, and custom workflows as needed.